Deploy and Secure a Highly Available RabbitMQ Cluster in OCI
February 09, 2022
RabbitMQ is a widely used and popular message broker. It is open-source and deployable almost anywhere. In this post, we’re going to explore how to deploy and secure a RabbitMQ cluster in Oracle Cloud Infrastructure (OCI).
Note: I will intentionally skip load balancer and bastion service configurations details in this post. You may look at Oracle documentation for details on how to configure both.
Architecture
The following diagram is a representation of how I am going to deploy RabbitMQ in my tenancy.
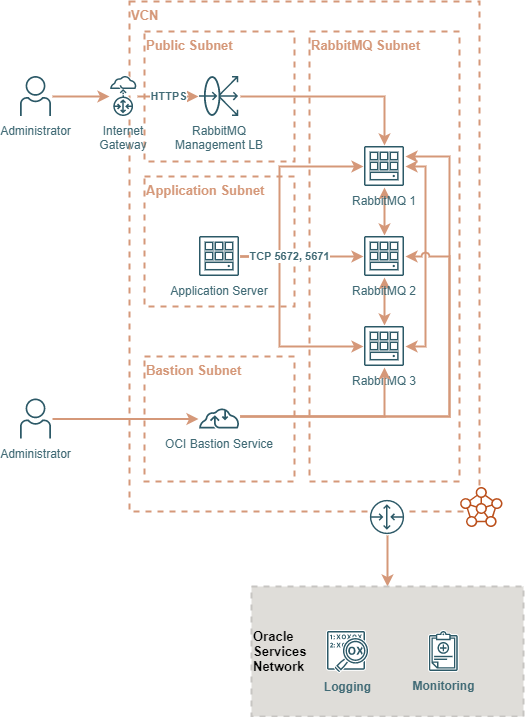
The application subnet is where RabbitMQ clients (Publishers and Consumers) live. RabbitMQ cluster is going to be deployed in a private subnet for this example. The public subnet is created to allow me to access the management UI from the internet. In your environment, you will most likely configure access through your on-premises network or via a VPN client. The bastion subnet contains OCI bastion sessions I will use to access RabbitMQ servers via SSH.
Cluster Formation & Configuration
There are four primary concerns when deploying RabbitMQ to OCI: Number of nodes, Bandwidth required, Node Shape, and Storage Performance. To help size your cluster appropriately, you need to calculate or forecast a few variables including the number of messages per second, average message size, the average number of connections, number of queues…etc. There’s a blog post with some helpful benchmarks to help you decide how to size your environment properly.
In our example, we are going to use the following:
- Number of instances: 3. RabbitMQ recommends that clusters be deployed with an odd node count. This allows RabbitMQ nodes to reach a majority consensus and elect a leader in the cluster.
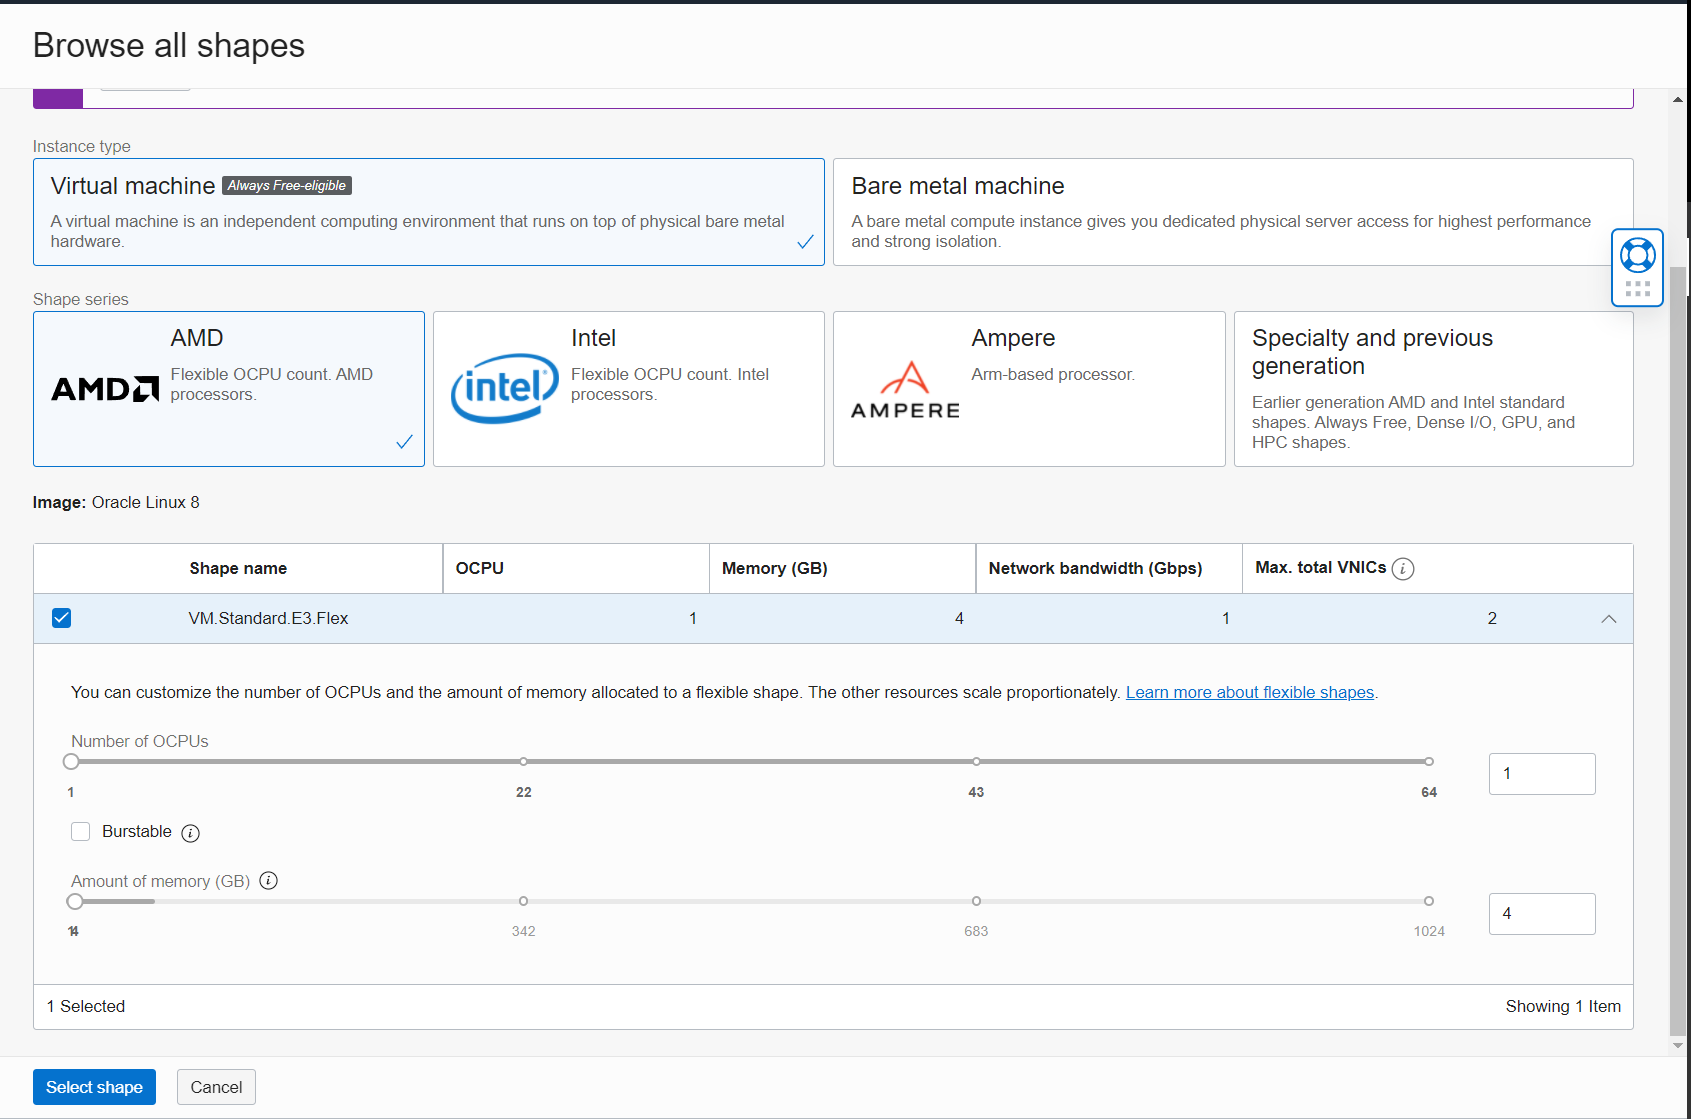
- Node Shape: VM.Standard.E3.Flex with 1 OCPU and 4 GBs of RAM. This gives us 2 vCPUs and 1 Gbps of bandwidth. You can choose larger shapes depending on your environment. Note that increasing the number of OCPUs gives you more network bandwidth.
- Storage Performance: In our example, we are going to create 3 block volumes and attach them to the 3 instances. We are going to choose the balanced performance level with a volume size of 50 GB. This gives us 3000 IOPS and 24 MB/s of throughput. In larger environments, you may want to increase the block performance depending on your need. You may also want to attach multiple volumes per instance to separate RabbitMQ Logs IOPS and maximize Data IOPS. Note that the size of the volume also affects its performance. Do not forget to create the appropriate backup policies for these volumes in your production environment.
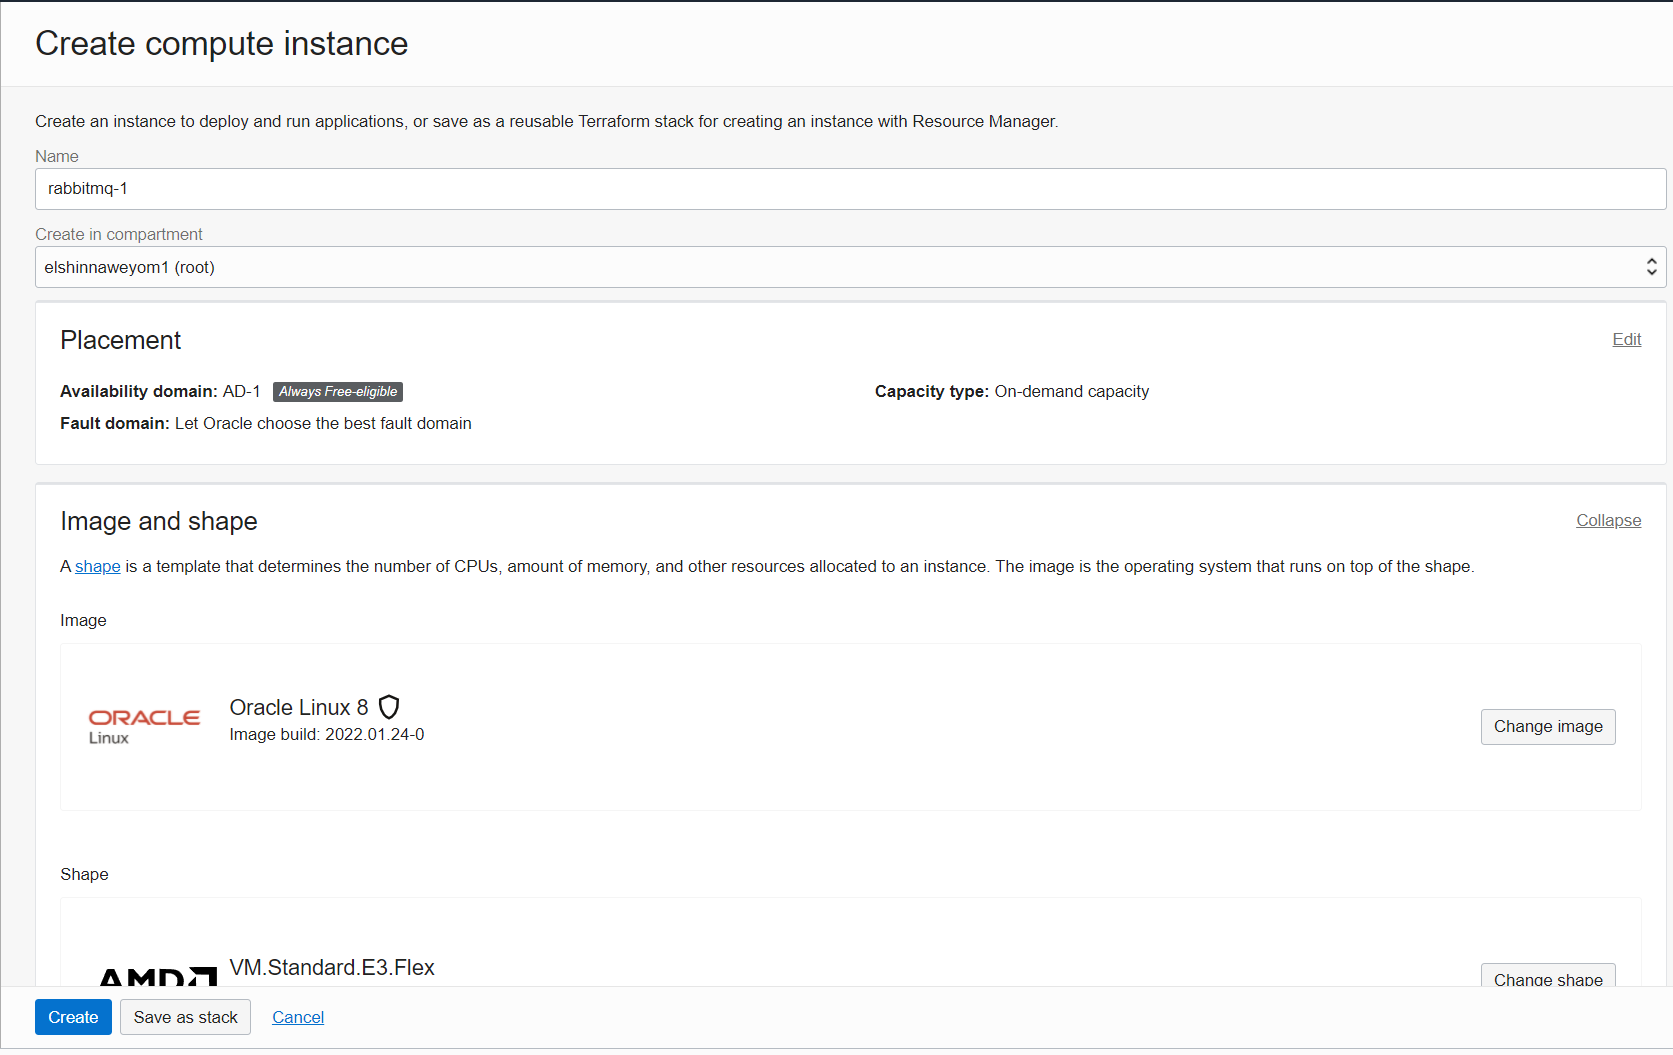
- Operating System: We are going to use Oracle Linux 8.
Creating Network Prerequisites
-
Login to your OCI tenancy and go to Virtual Cloud Networks.
-
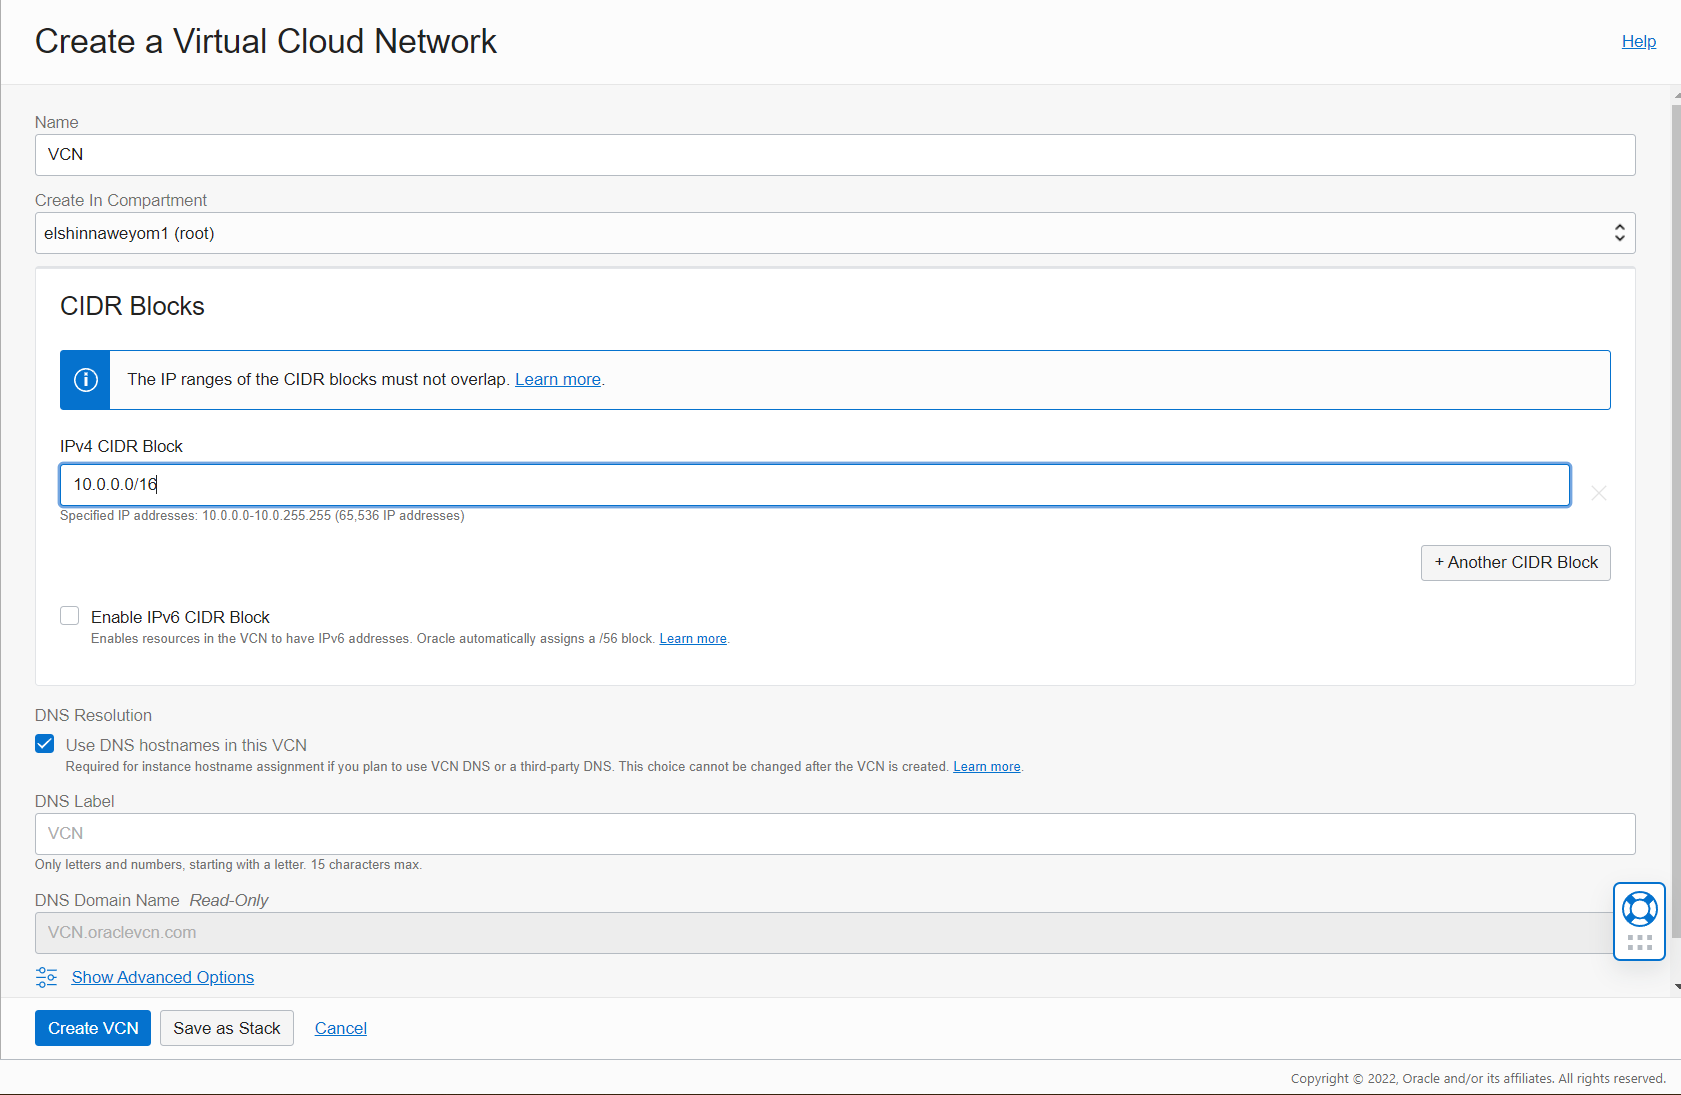
Create VCN:
-
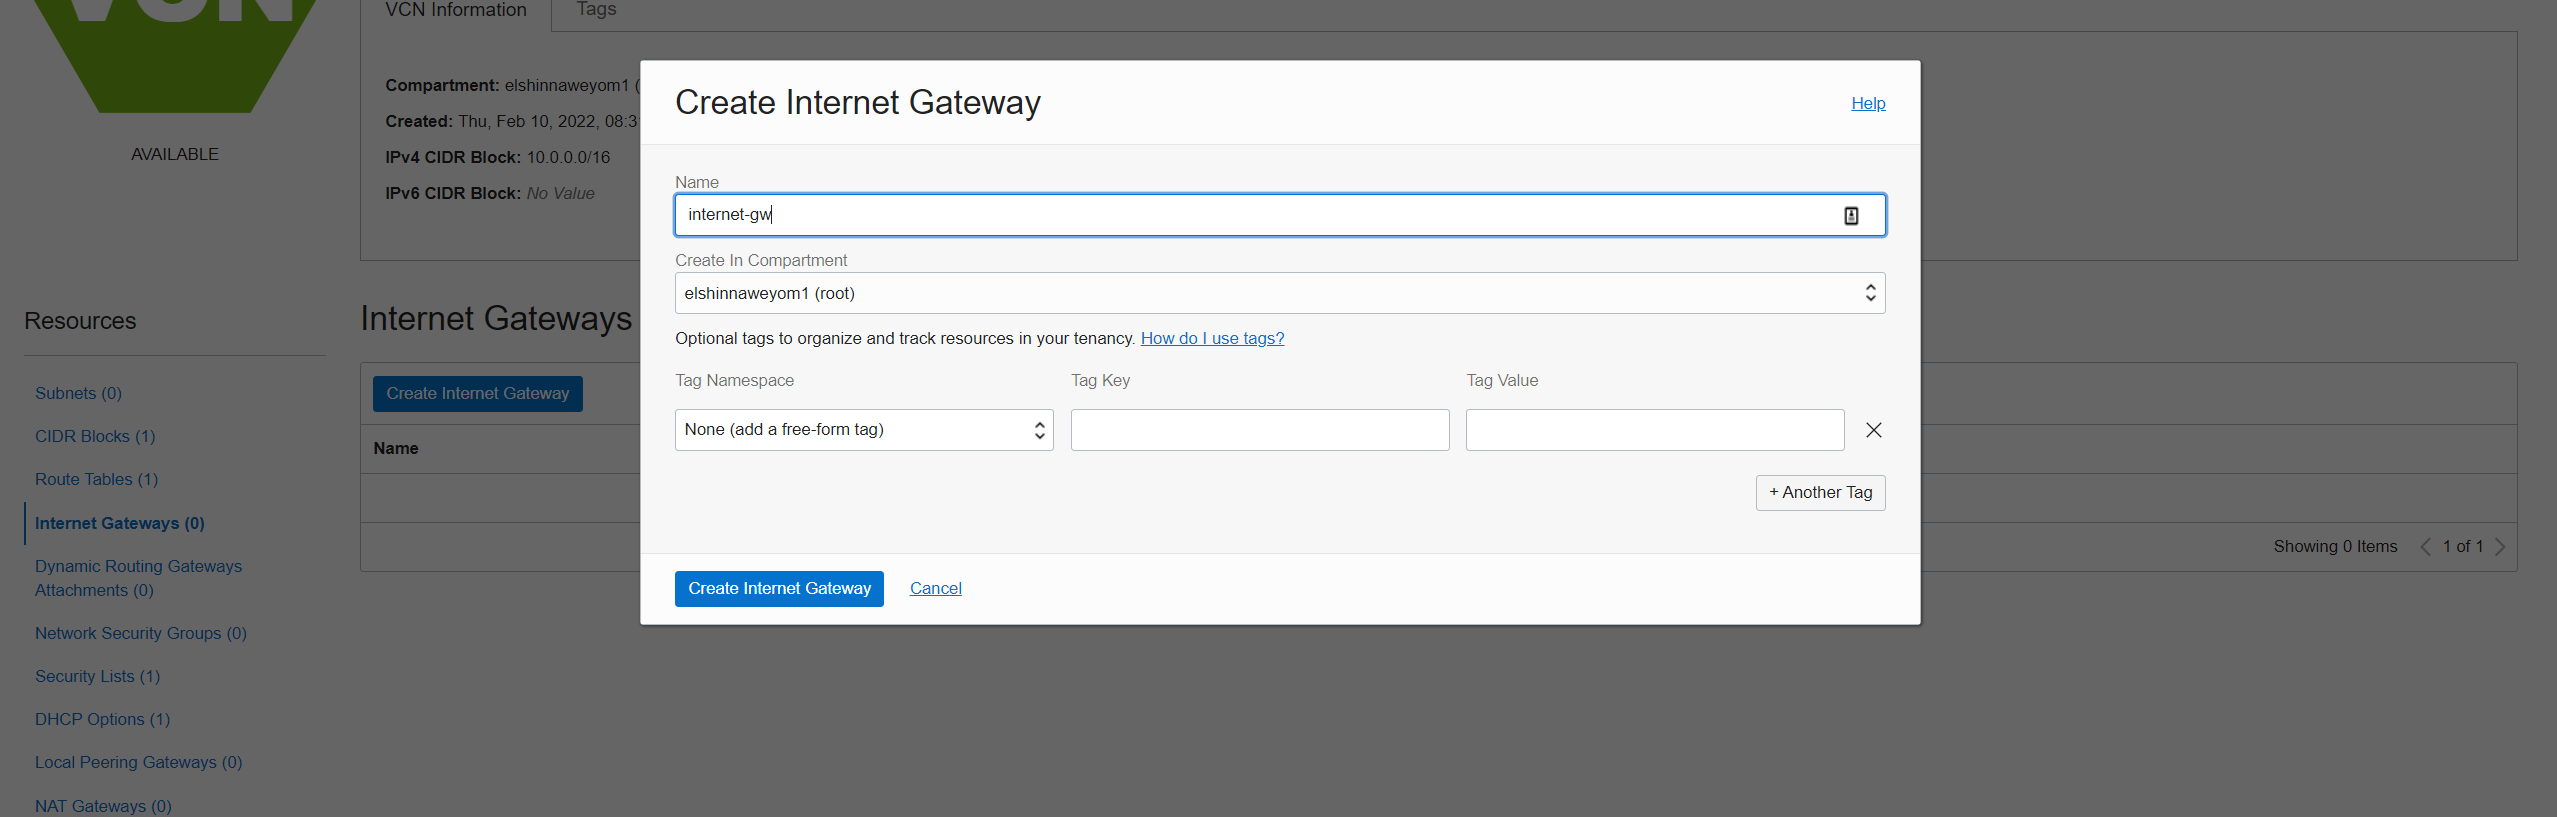
Create Internet Gateway:
-
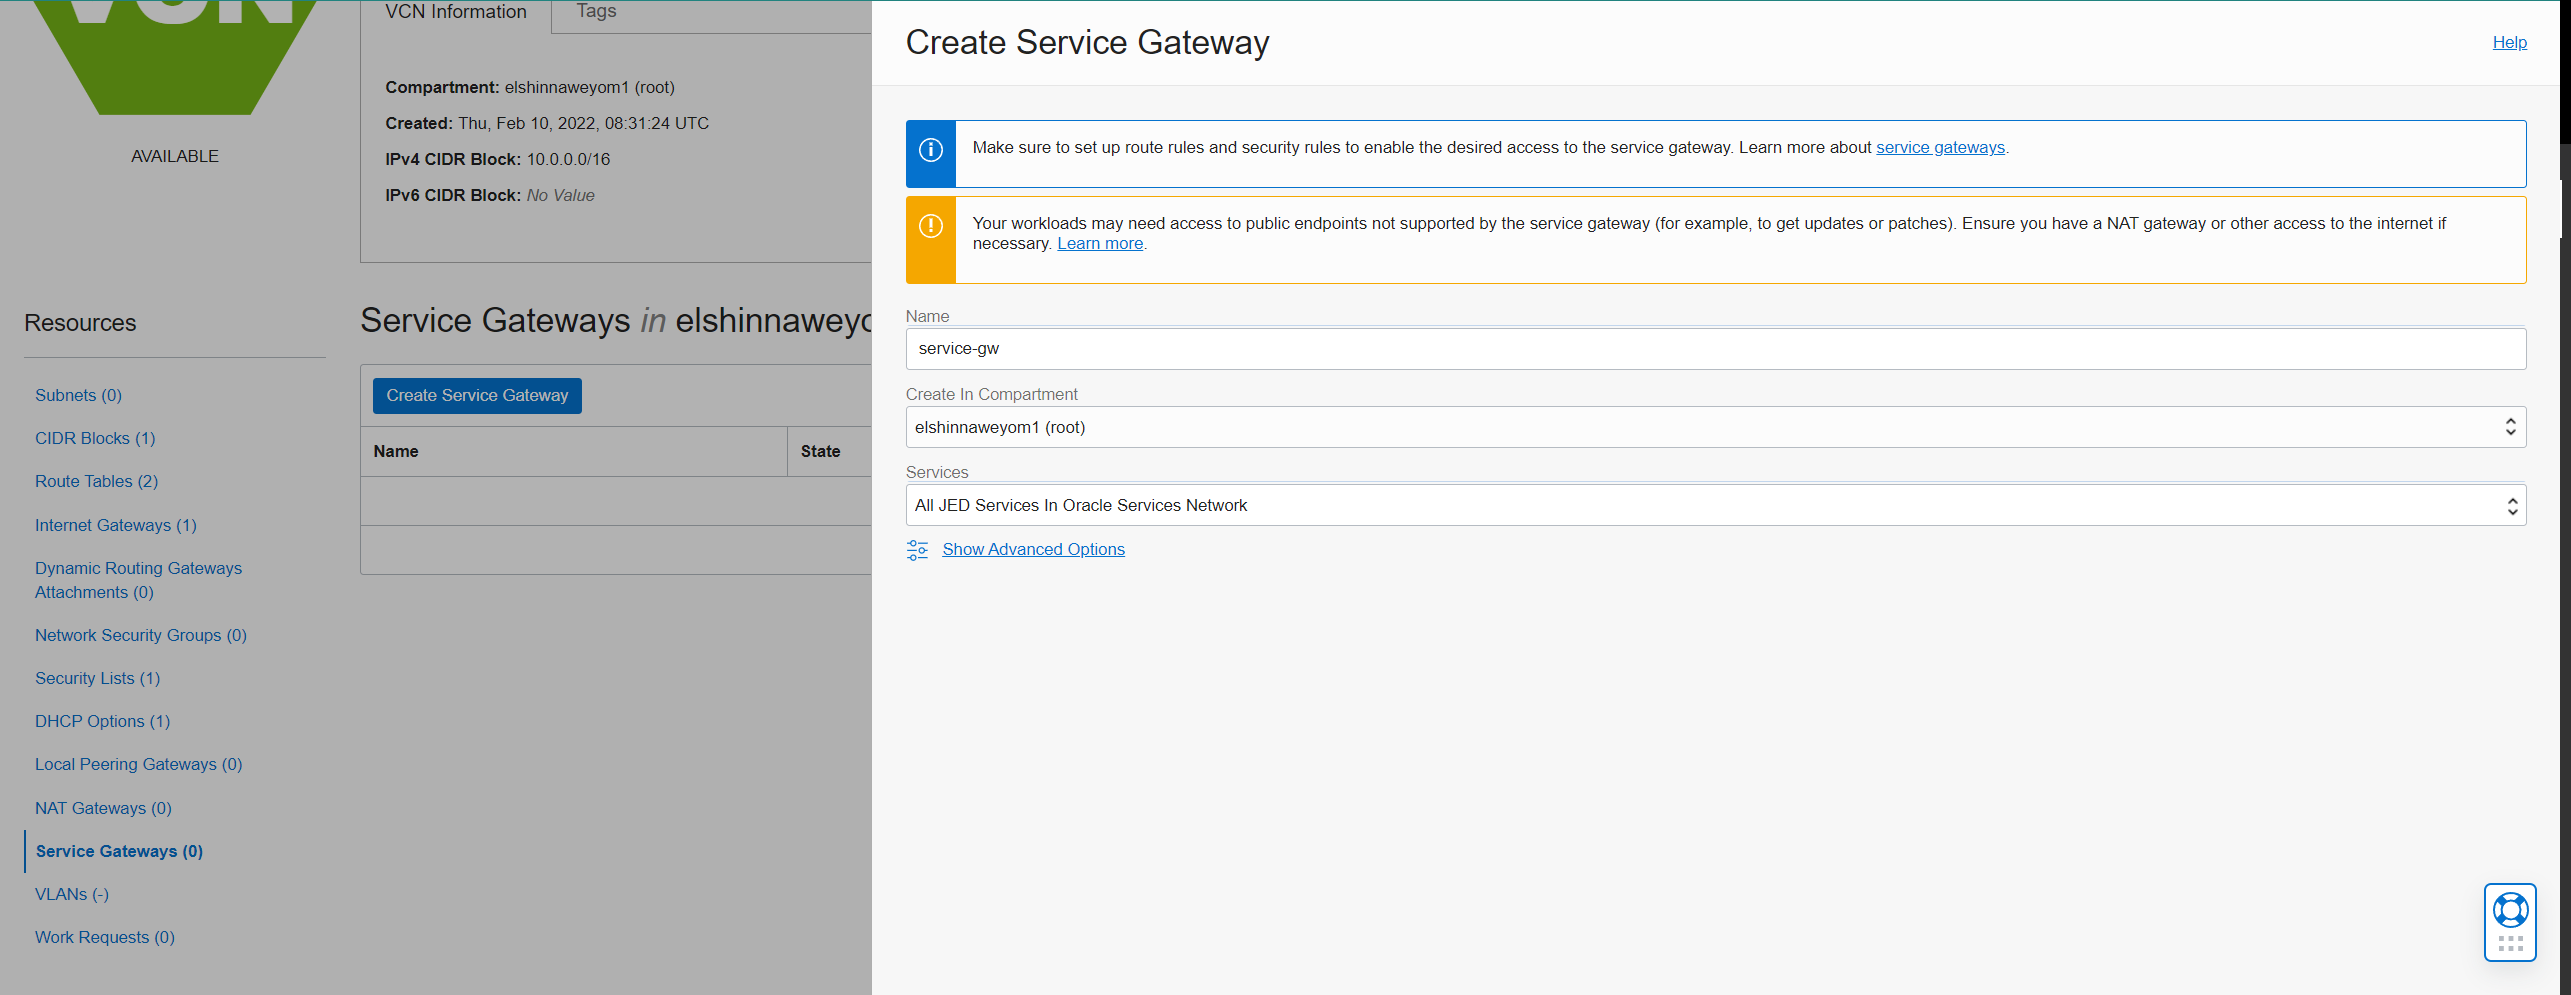
Create Service Gateway:
-
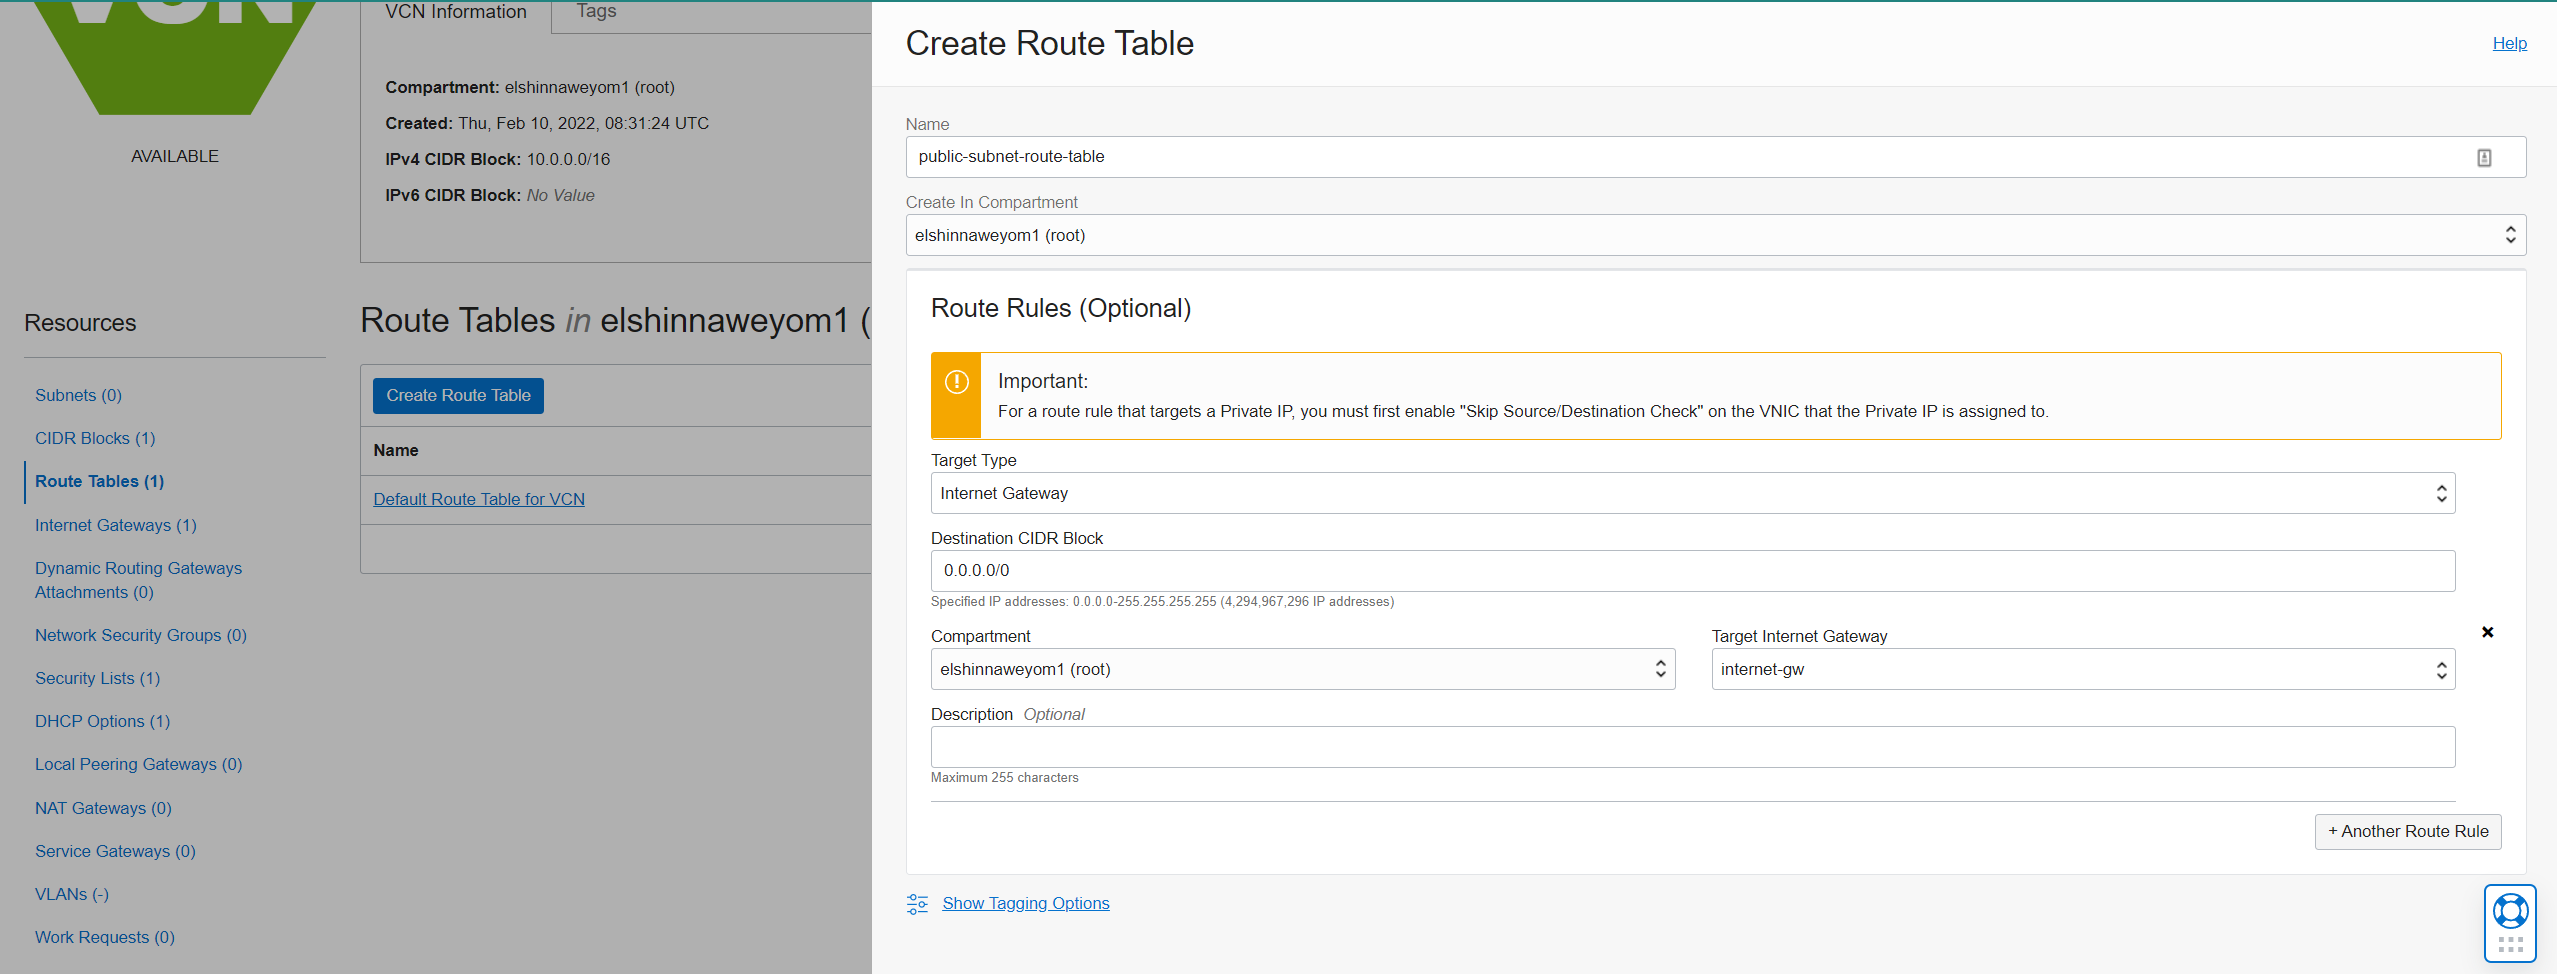
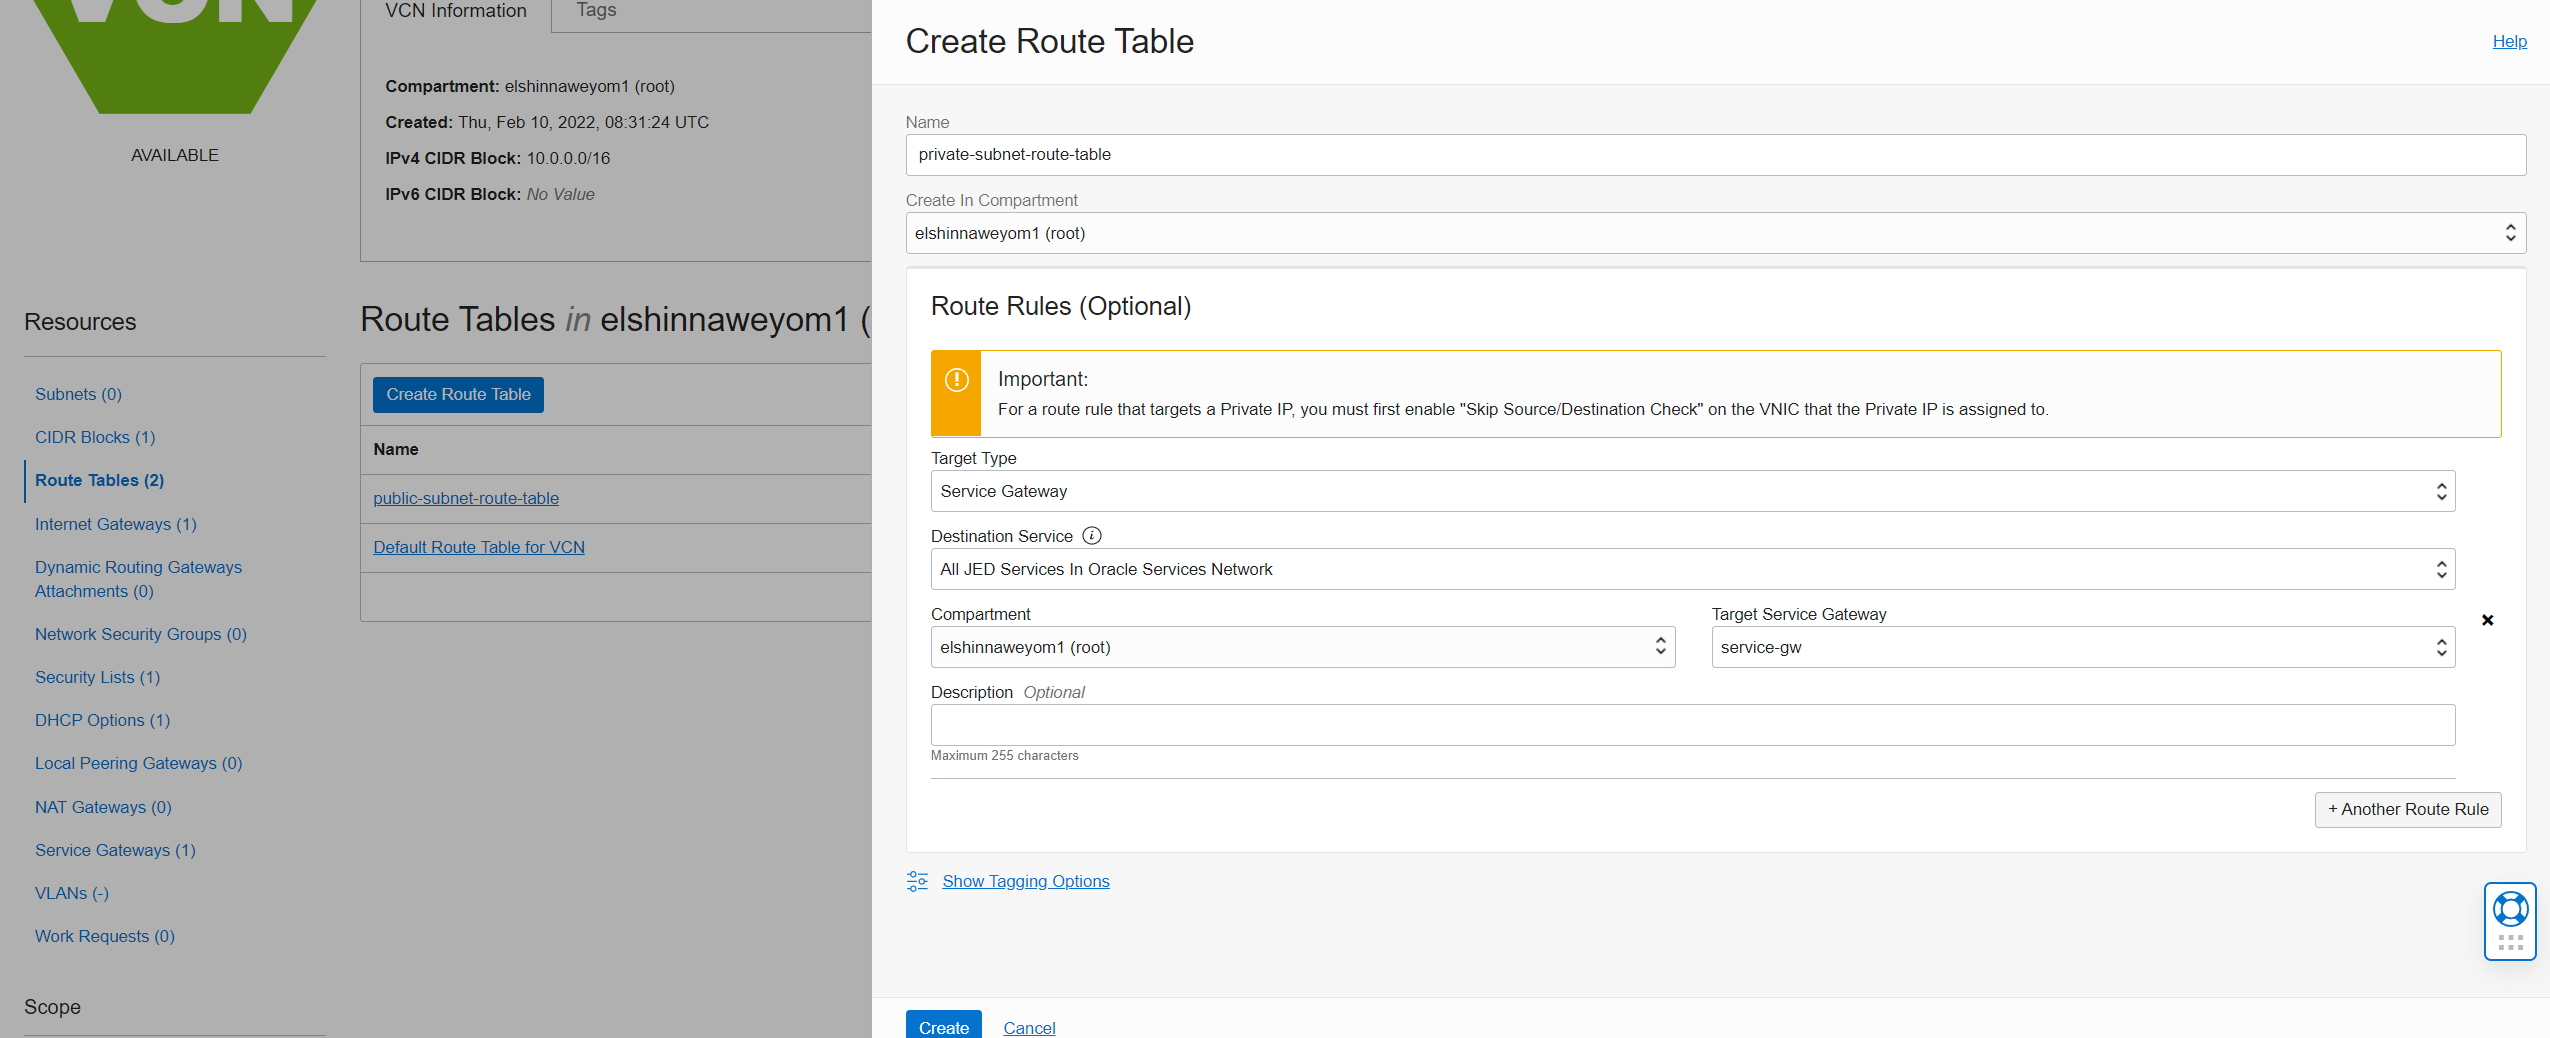
Create two route tables, one for the public subnet and one for the rest of the subnets:
-
Public subnet route table:
-
Private subnet route table:
-
-
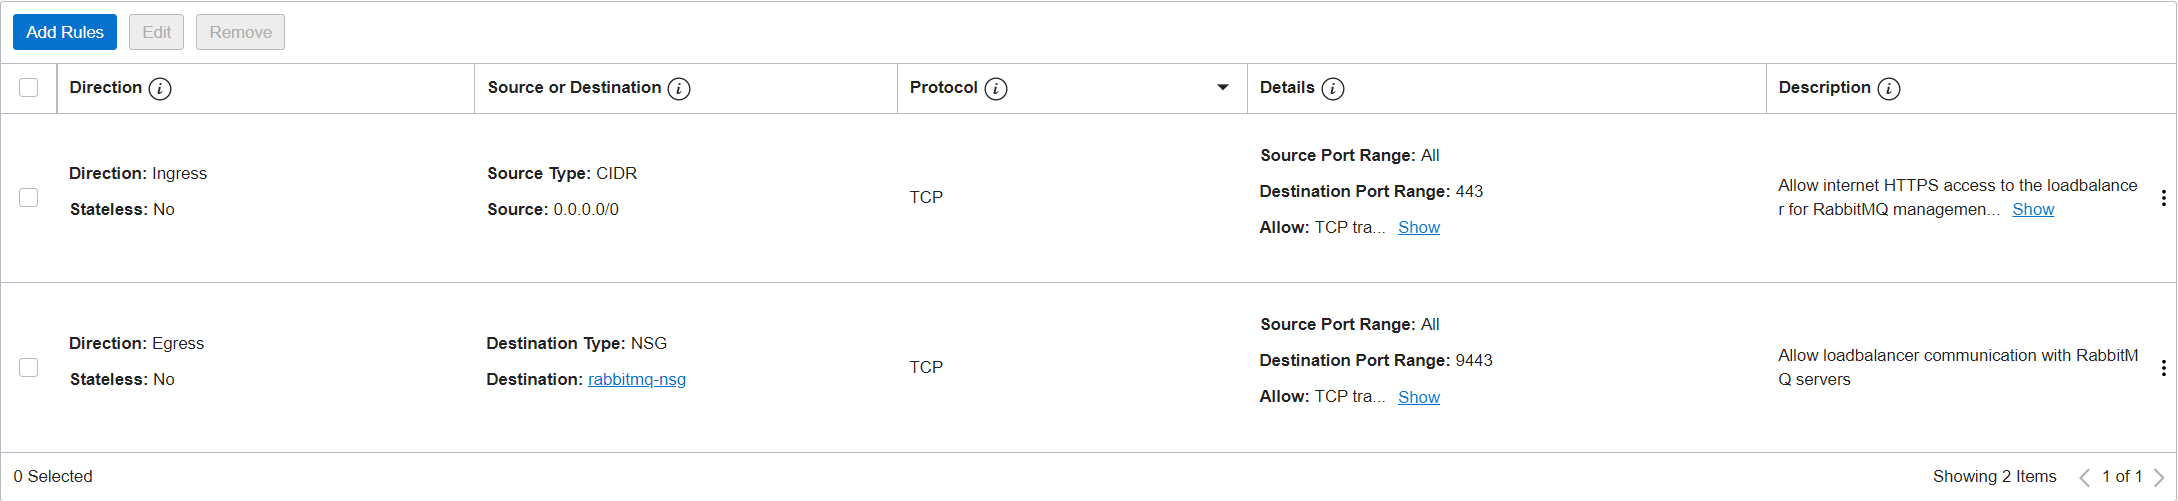
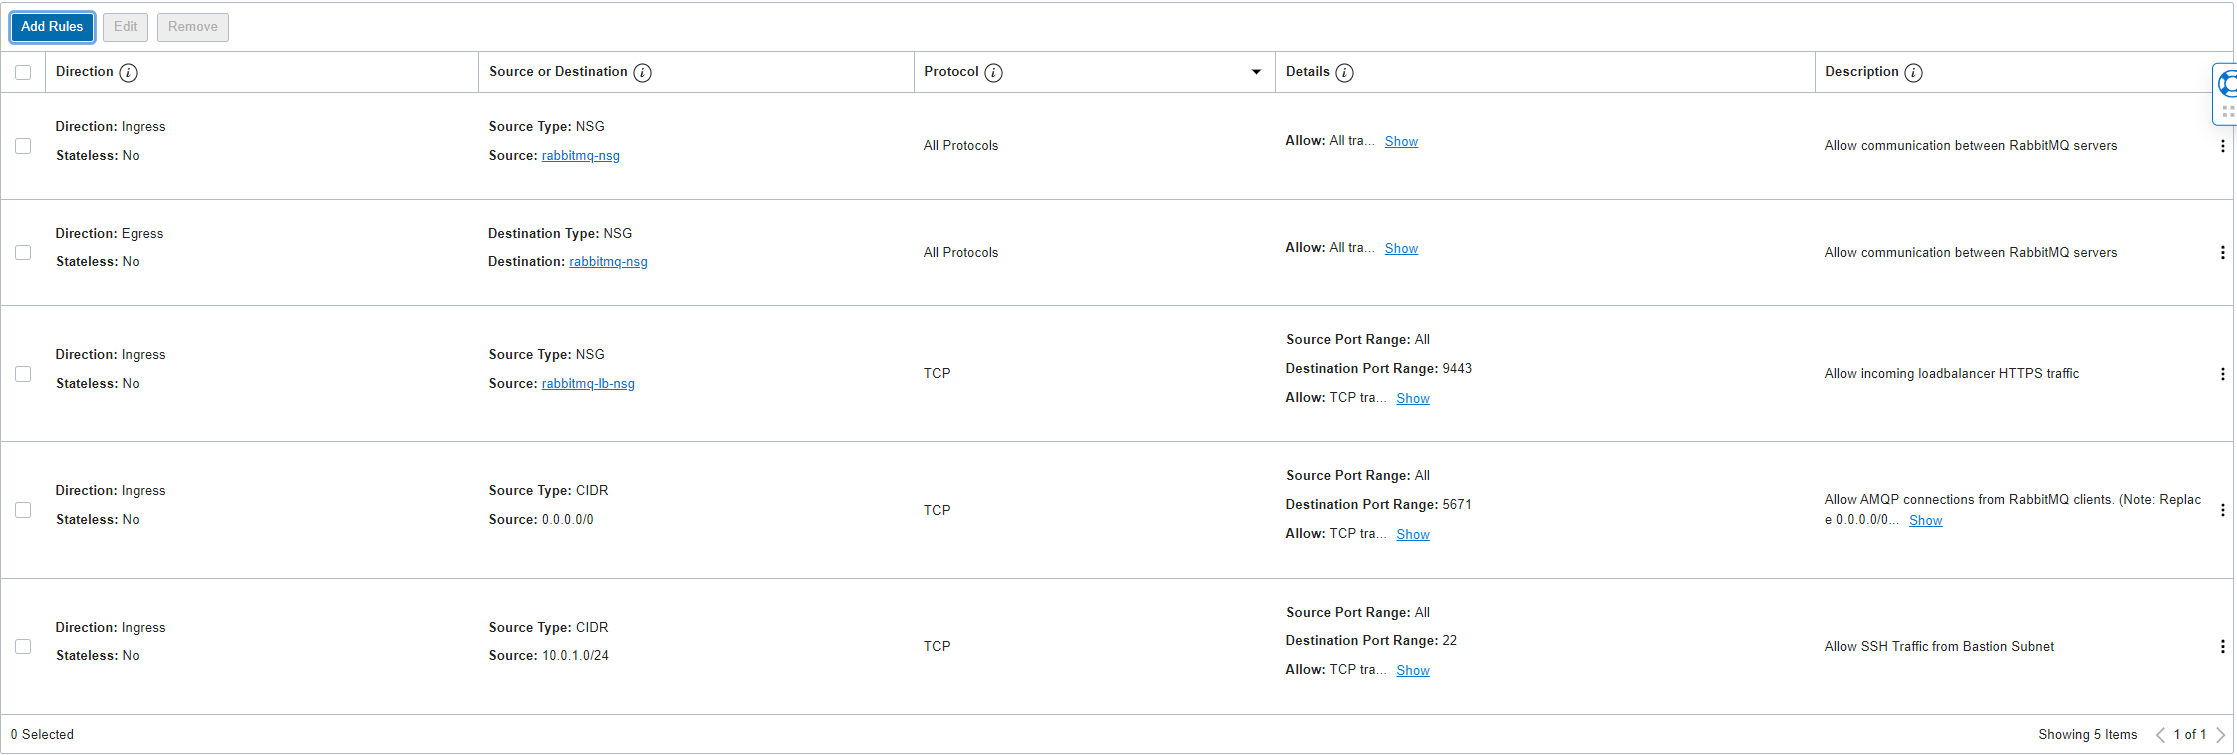
Create two Network Security Groups, rabbitmq-lb-nsg for the public load balancer and rabbitmq-nsg for the instances, and then add the following rules:
-
For rabbitmq-lb-nsg:
-
For rabbitmq-nsg:
-
-
Create the three subnets displayed in the diagram above. The public subnet is the only subnet that should be public. I chose the following CIDR blocks for my subnets:
- Public Subnet: 10.0.0.0/24
- Bastion Subnet: 10.0.1.0/24
- RabbitMQ Subnet: 10.0.2.0/24
Creating Instances & Block Volumes
-
Go to block volumes under storage and create volumes:
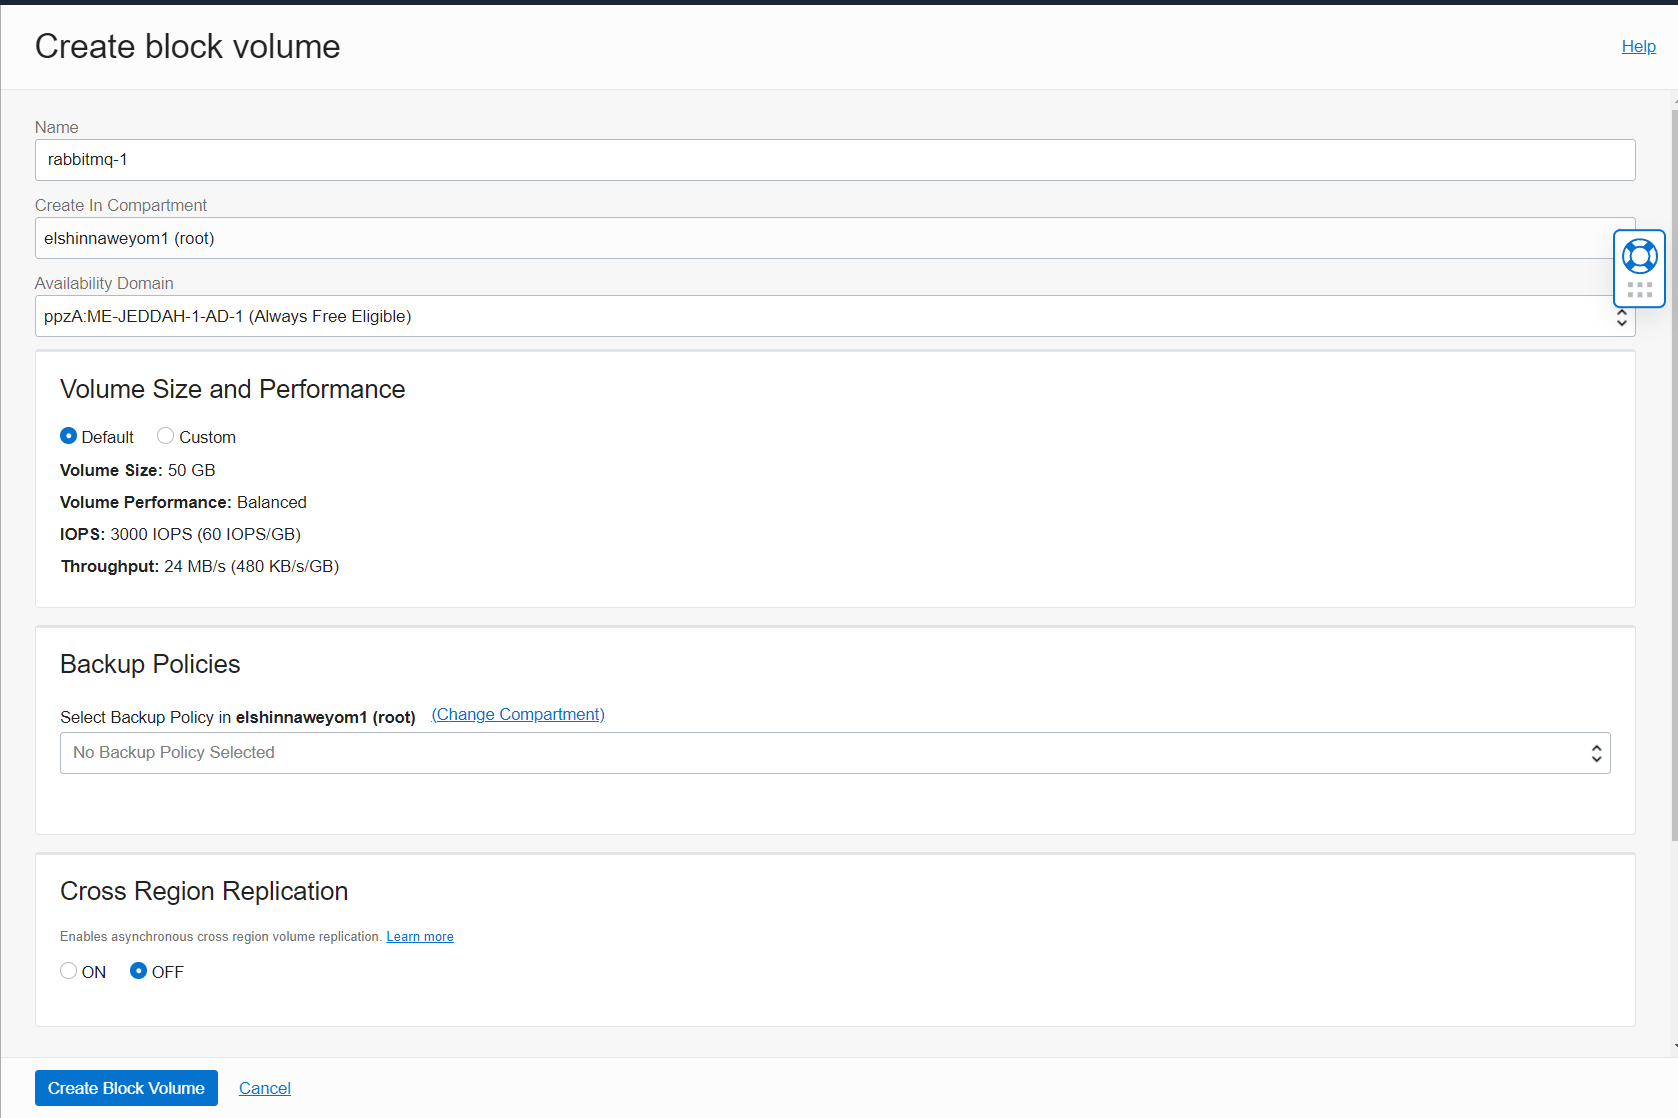
Repeat this step to create rabbitmq-2 and rabbitmq-3 volumes.
-
Go to Compute Instances and select “Create Instance”:
-
In the placement section, make sure the fault domain is different between the three instances:
-
Edit the shape to select the shape of your choosing:
-
Choose the subnet and assign the network security group:

-
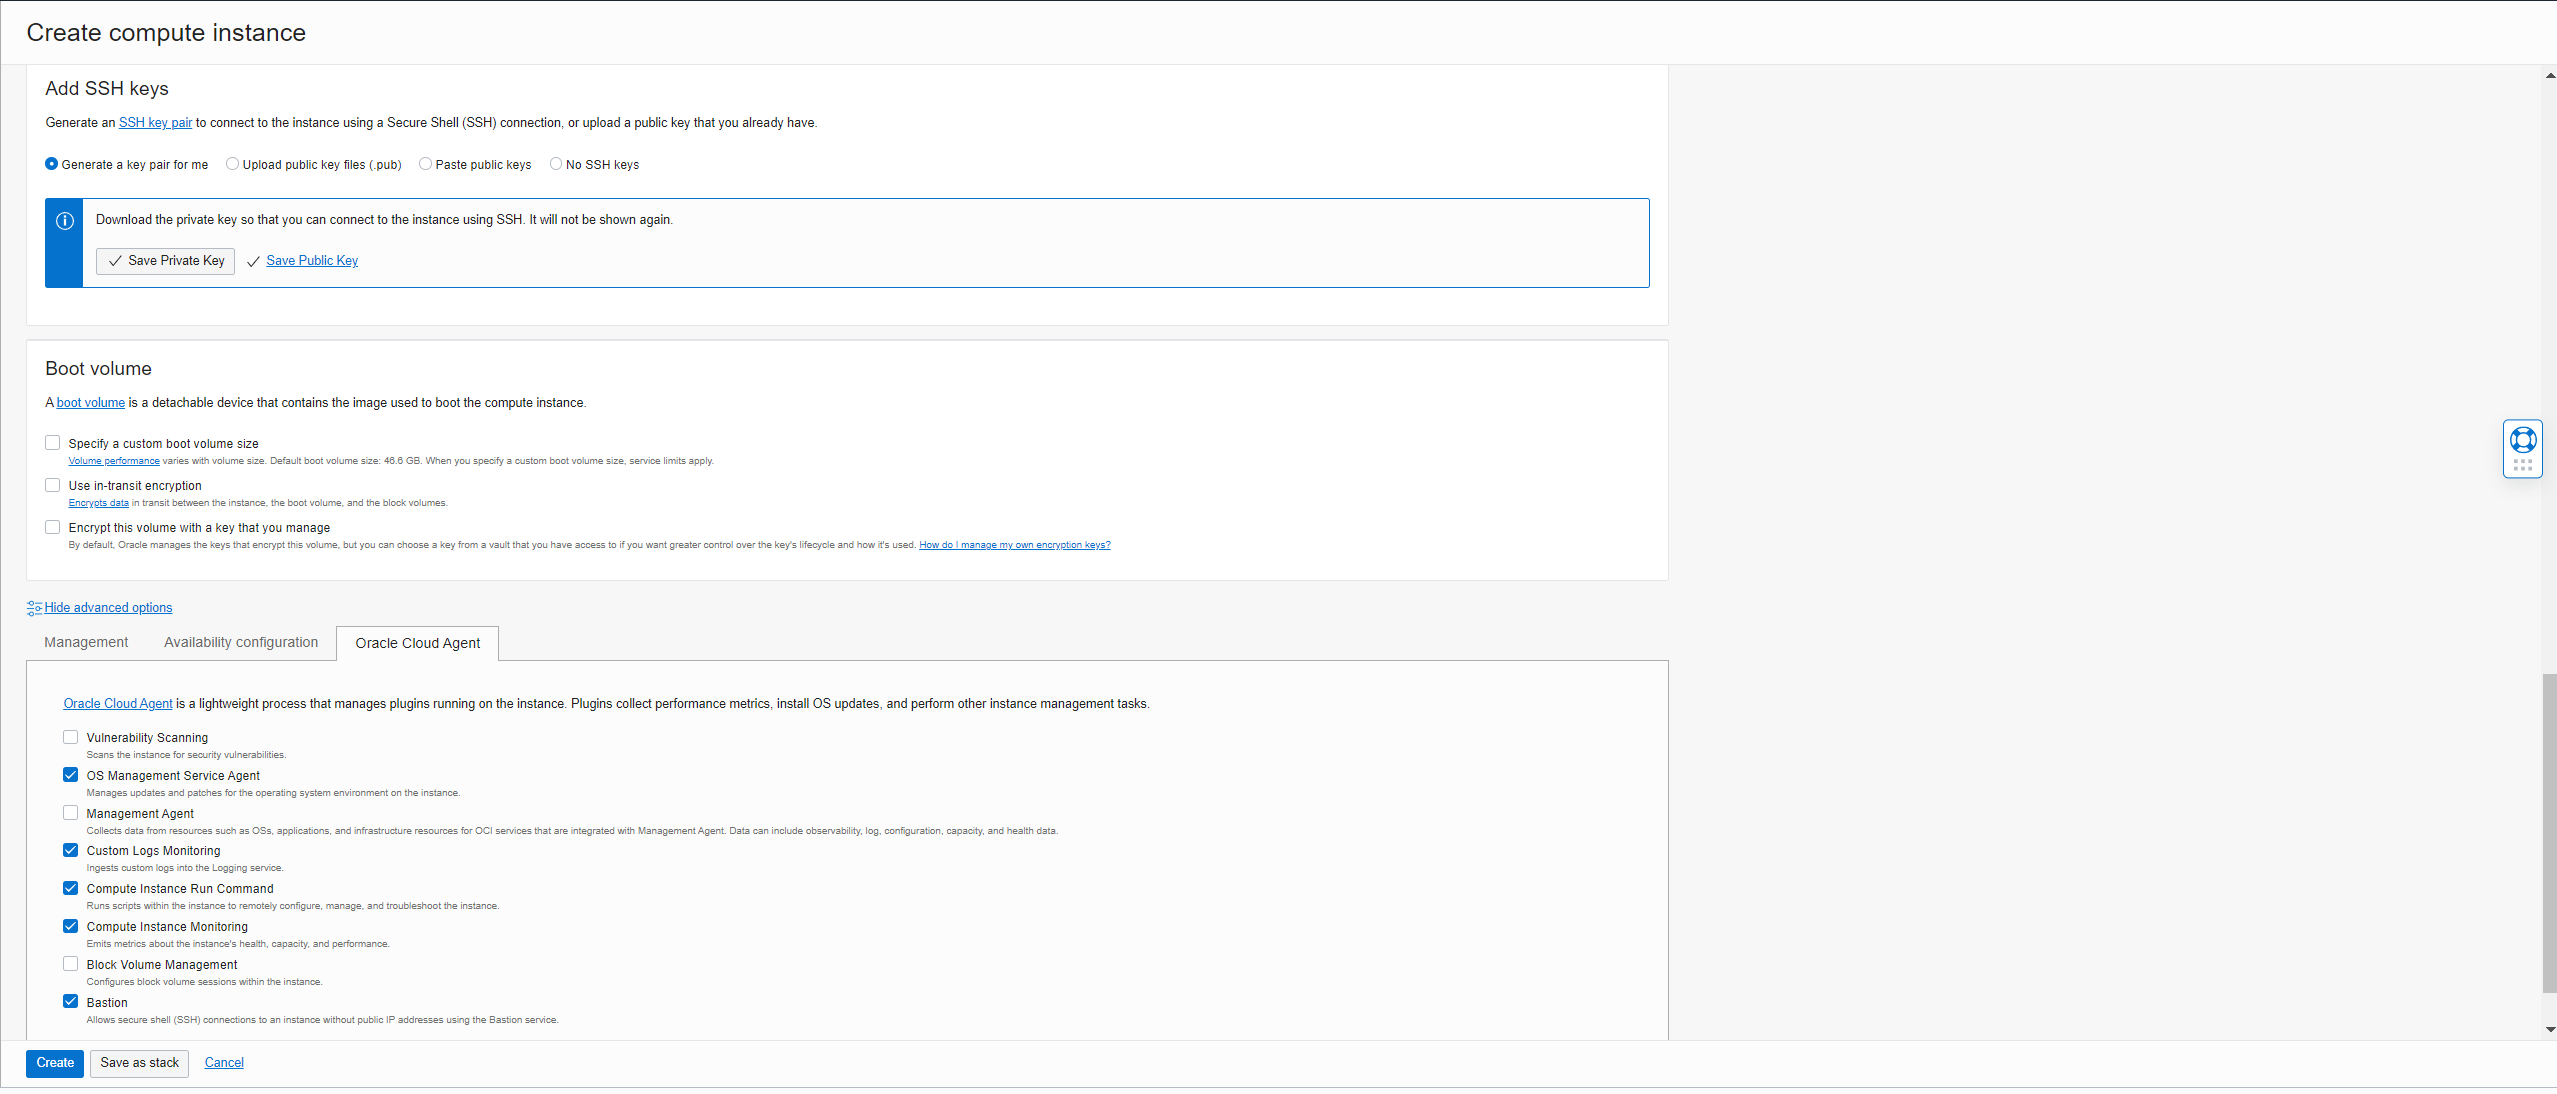
Configure the public & private keys. Then make sure the Bastion Plugin is selected under advanced options:
-
-
In each of the instances, attach the block volumes:
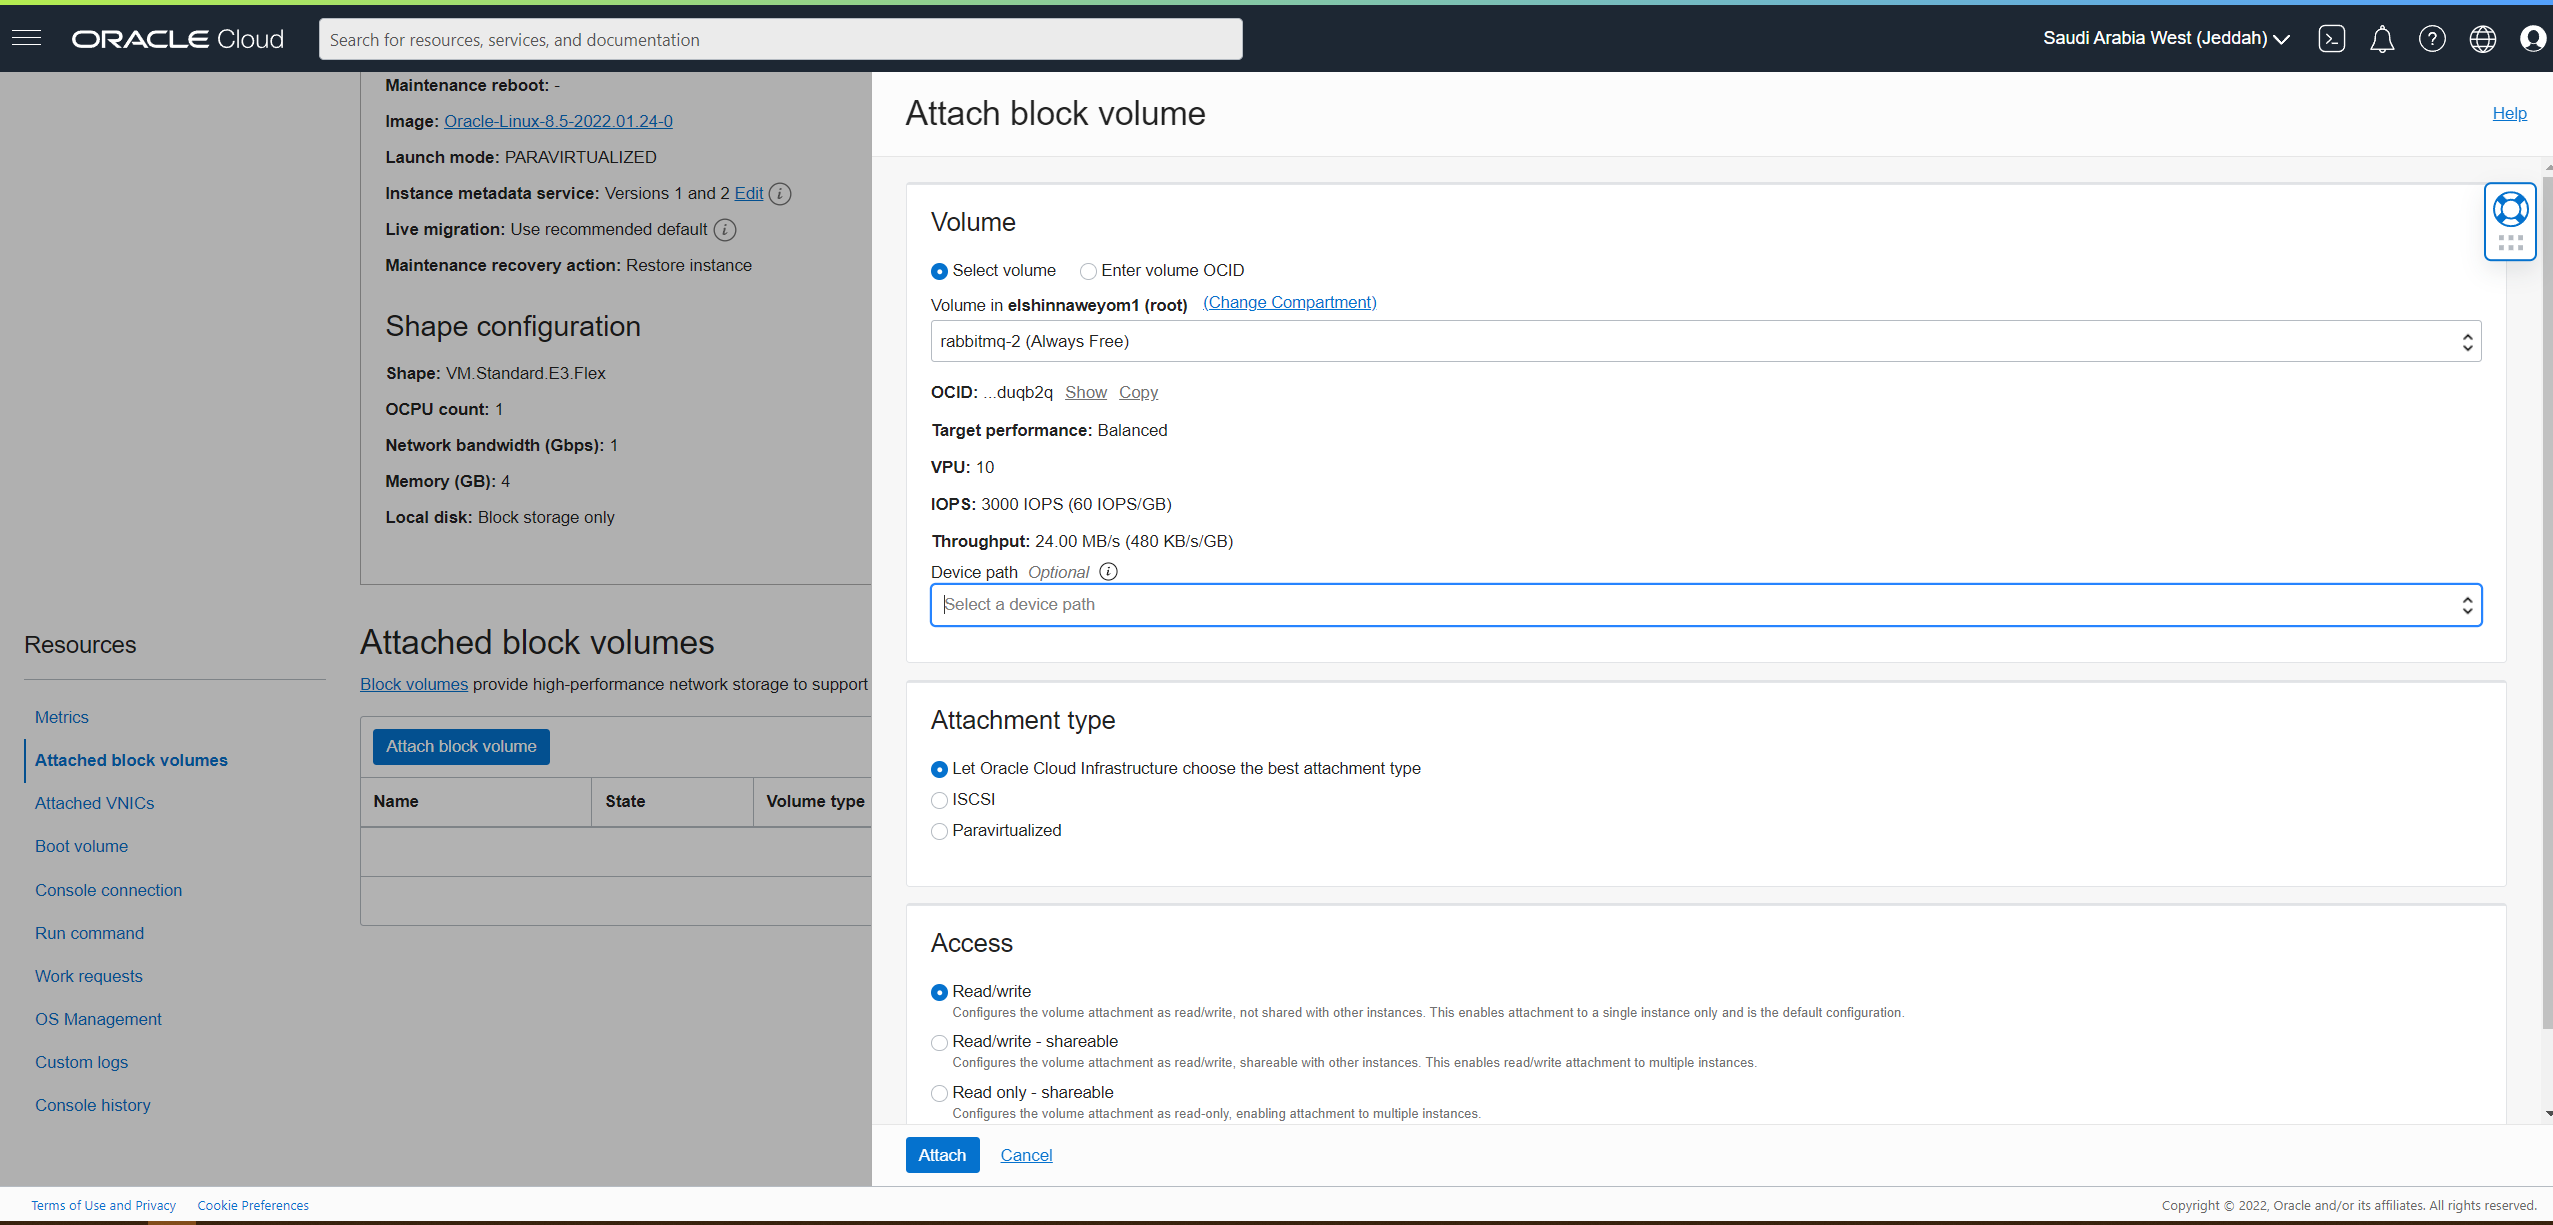
-
SSH into all three instances and execute
mkdir /mnt/rabbitmqto create RabbitMQ directory. -
Mount the block volumes in all three instances:
-
From the cloud console, copy the block volume connect commands:
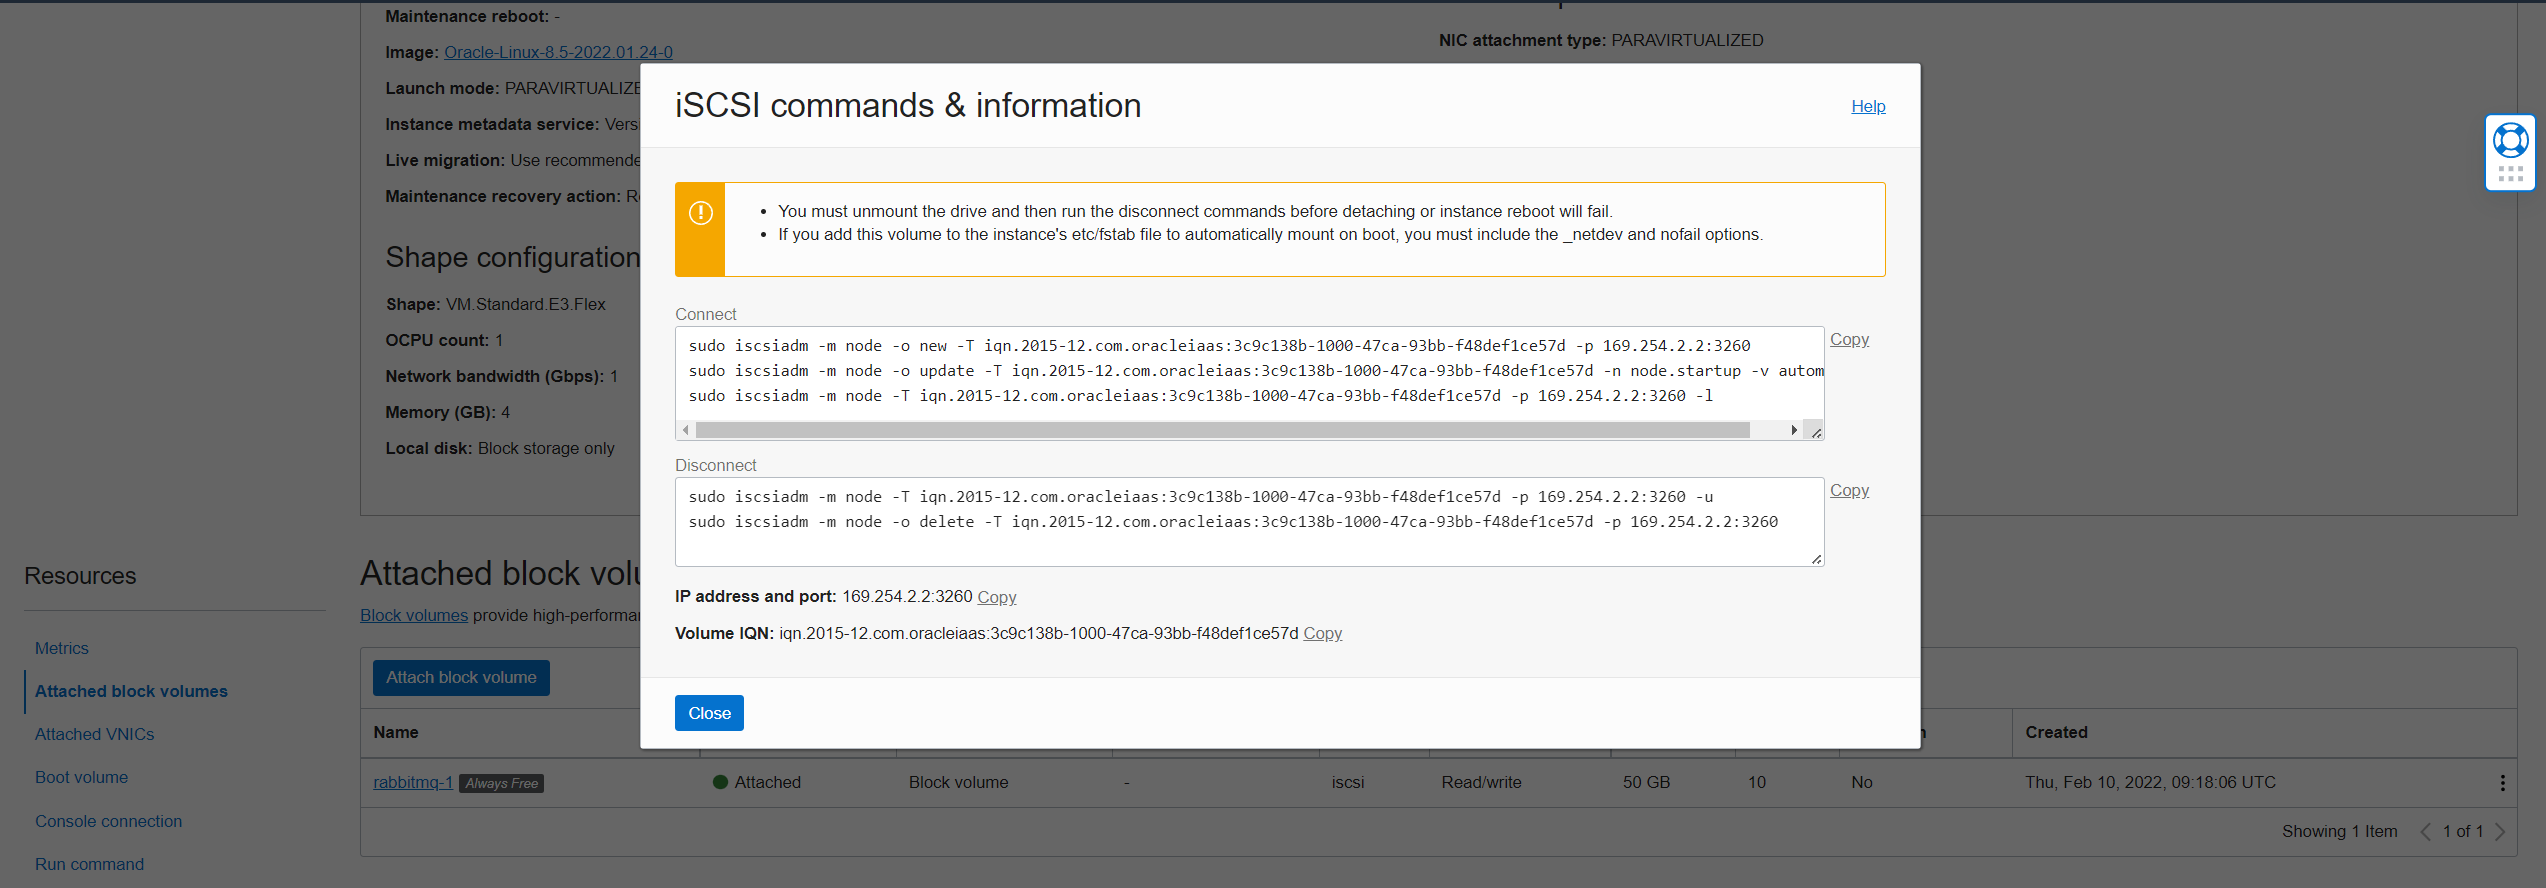
-
Execute the commands then execute
lsblkto verify. Note the sdb block now appears at the bottom: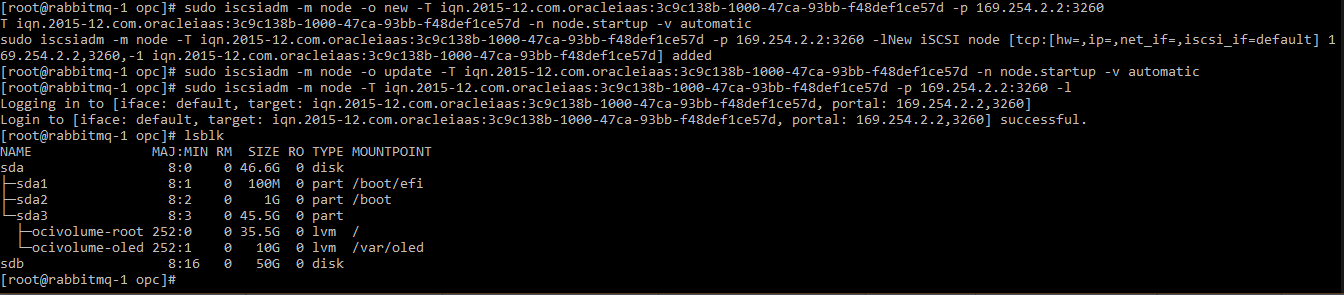
-
Execute
mkfs.ext4 /dev/sdbto create the file system:
-
To find the block UUID execute
blkidcommand, copy the UUID:
-
Execute
sudo vi /etc/fstabto open the file in a text editor and add the following to the end of the file, then save and quit:UUID="<UUID you copied from the previous step>" /mnt/rabbitmq ext4 defaults,_netdev,nofail 0 2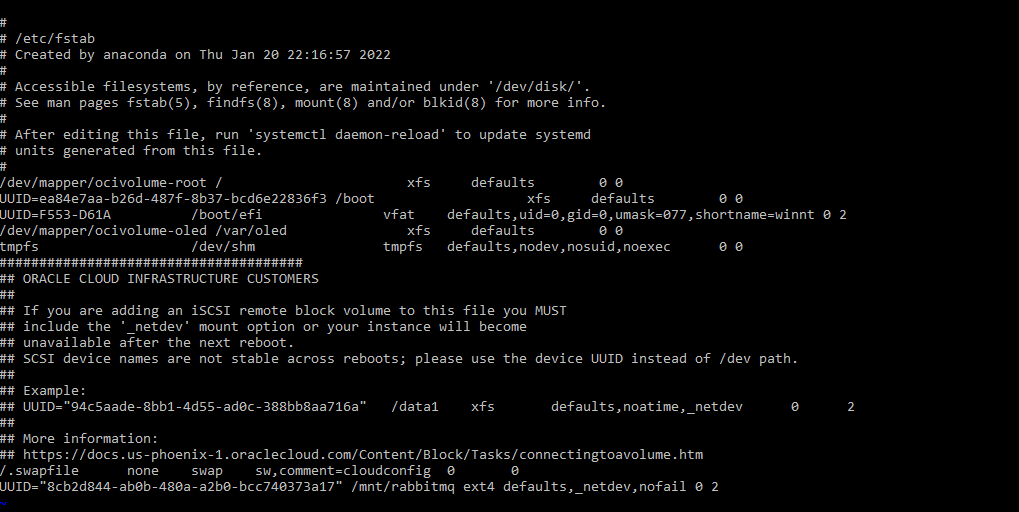
-
Execute
sudo mount -ato mount the block. -
To verify, execute
df -h: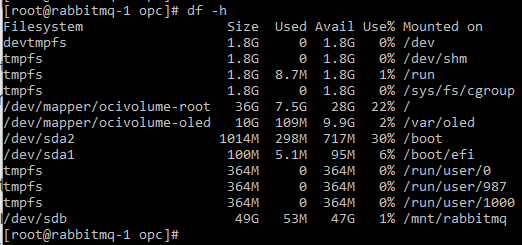
-
Repeat these steps for all three servers.
-
Installing & Configuring RabbitMQ
- Generate certificates for each server node using this guide and upload them to the instances.
- Generate or use an existing certificate for the management UI and upload it to the instances.
- Download Erlang and RabbitMQ RPMs.
- Install Erlang RPM by executing
sudo rpm -i /tmp/erlang-24.2.1-1.el8.x86_64.rpm - Install RabbitMQ RPM by executing
sudo rpm -i /tmp/rabbitmq-server-3.9.13-1.el8.noarch.rpm -
Go to
/etc/rabbitmq/& createrabbitmq.confwith the following content:listeners.tcp = none listeners.ssl.default = 5671 ssl_options.cacertfile = /path/to/ca_certificate.pem ssl_options.certfile = /path/to/server_certificate.pem ssl_options.keyfile = /path/to/server_key.pem ssl_options.verify = verify_peer ssl_options.fail_if_no_peer_cert = true default_user = admin default_pass = 768a852ed69ce916fa7faa278c962de3e4275e5f management.ssl.port = 9443 management.ssl.cacertfile = /path/to/ca_certificate.pem management.ssl.certfile = /path/to/server_certificate.pem management.ssl.keyfile = /path/to/server_key.pem management.ssl.versions.1 = tlsv1.2 management.ssl.password = MySecretPasswordChange the paths to the certificates as appropriate. Make sure the certificate files are accessible to the rabbitmq user.
- Create
rabbitmq-env.confwith the following content:RABBITMQ_MNESIA_DIR=/mnt/rabbitmq/MNESIA -
Make sure rabbitmq user has ownership over these files by executing
sudo chown -R rabbitmq:rabbitmq /etc/rabbitmq/ - Execute the following commands:
mkdir /mnt/rabbitmq/MNESIAto create the directory which will hold RabbitMQ Data.sudo chown -R rabbitmq:rabbitmq /mnt/rabbitmqto make sure rabbitmq user has ownership over the directory.
- Start RabbitMQ Service by executing:
chkconfig rabbitmq-server on sudo systemctl start rabbitmq-server - In all of instances, run this command to enable management UI:
rabbitmq-plugins enable rabbitmq_management - RabbitMQ uses an erlang cookie to authenticate between cluster nodes. This cookie is generated in
/var/lib/rabbitmq/.erlang.cookieafter the broker launch. To make sure instances are able to communicate with each other, the cookie must be the same accross all instances. After you start the first instance:- Copy RabbitMQ ErLang Cookie from the file
/var/lib/rabbitmq/.erlang.cookie. - In the other two instances, create the file by executing
sudo vi /var/lib/rabbitmq/.erlang.cookieand pasting the cookie value. - Execute
sudo chown rabbitmq:rabbitmq .erlang.cookieto make rabbitmq the owner. - Execute
sudo chmod 400 .erlang.cookieto limit the permissions to this file.
- Copy RabbitMQ ErLang Cookie from the file
- To make the servers join the cluster, in RabbitMQ server 2 execute:
rabbitmqctl stop_app rabbitmqctl reset rabbitmqctl join_cluster rabbit@rabbitmq-1 rabbitmqctl start_app - Repeat in RabbitMQ server 3.
-
Execute
rabbitmqctl cluster_statusin all three instances, you should get similar output as the below: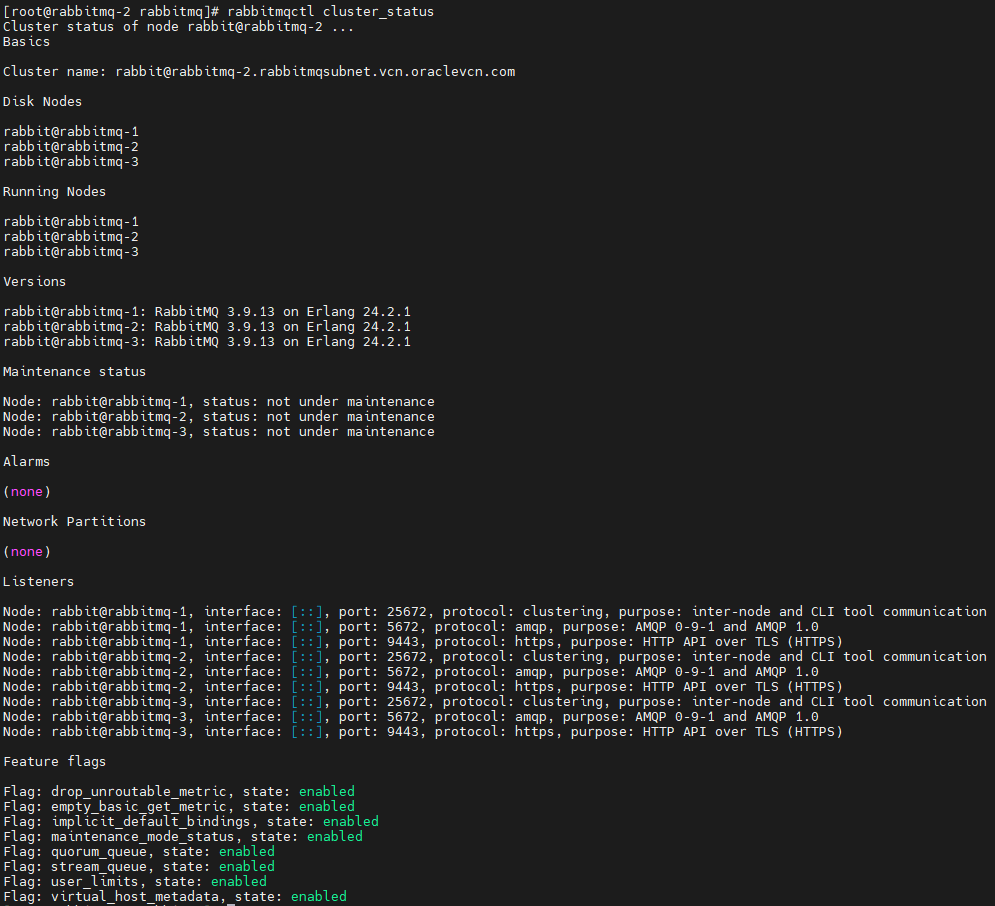
-
Go to the management UI using
https://server-1-ip:9443and login using the admin user credentials, you can now see the nodes: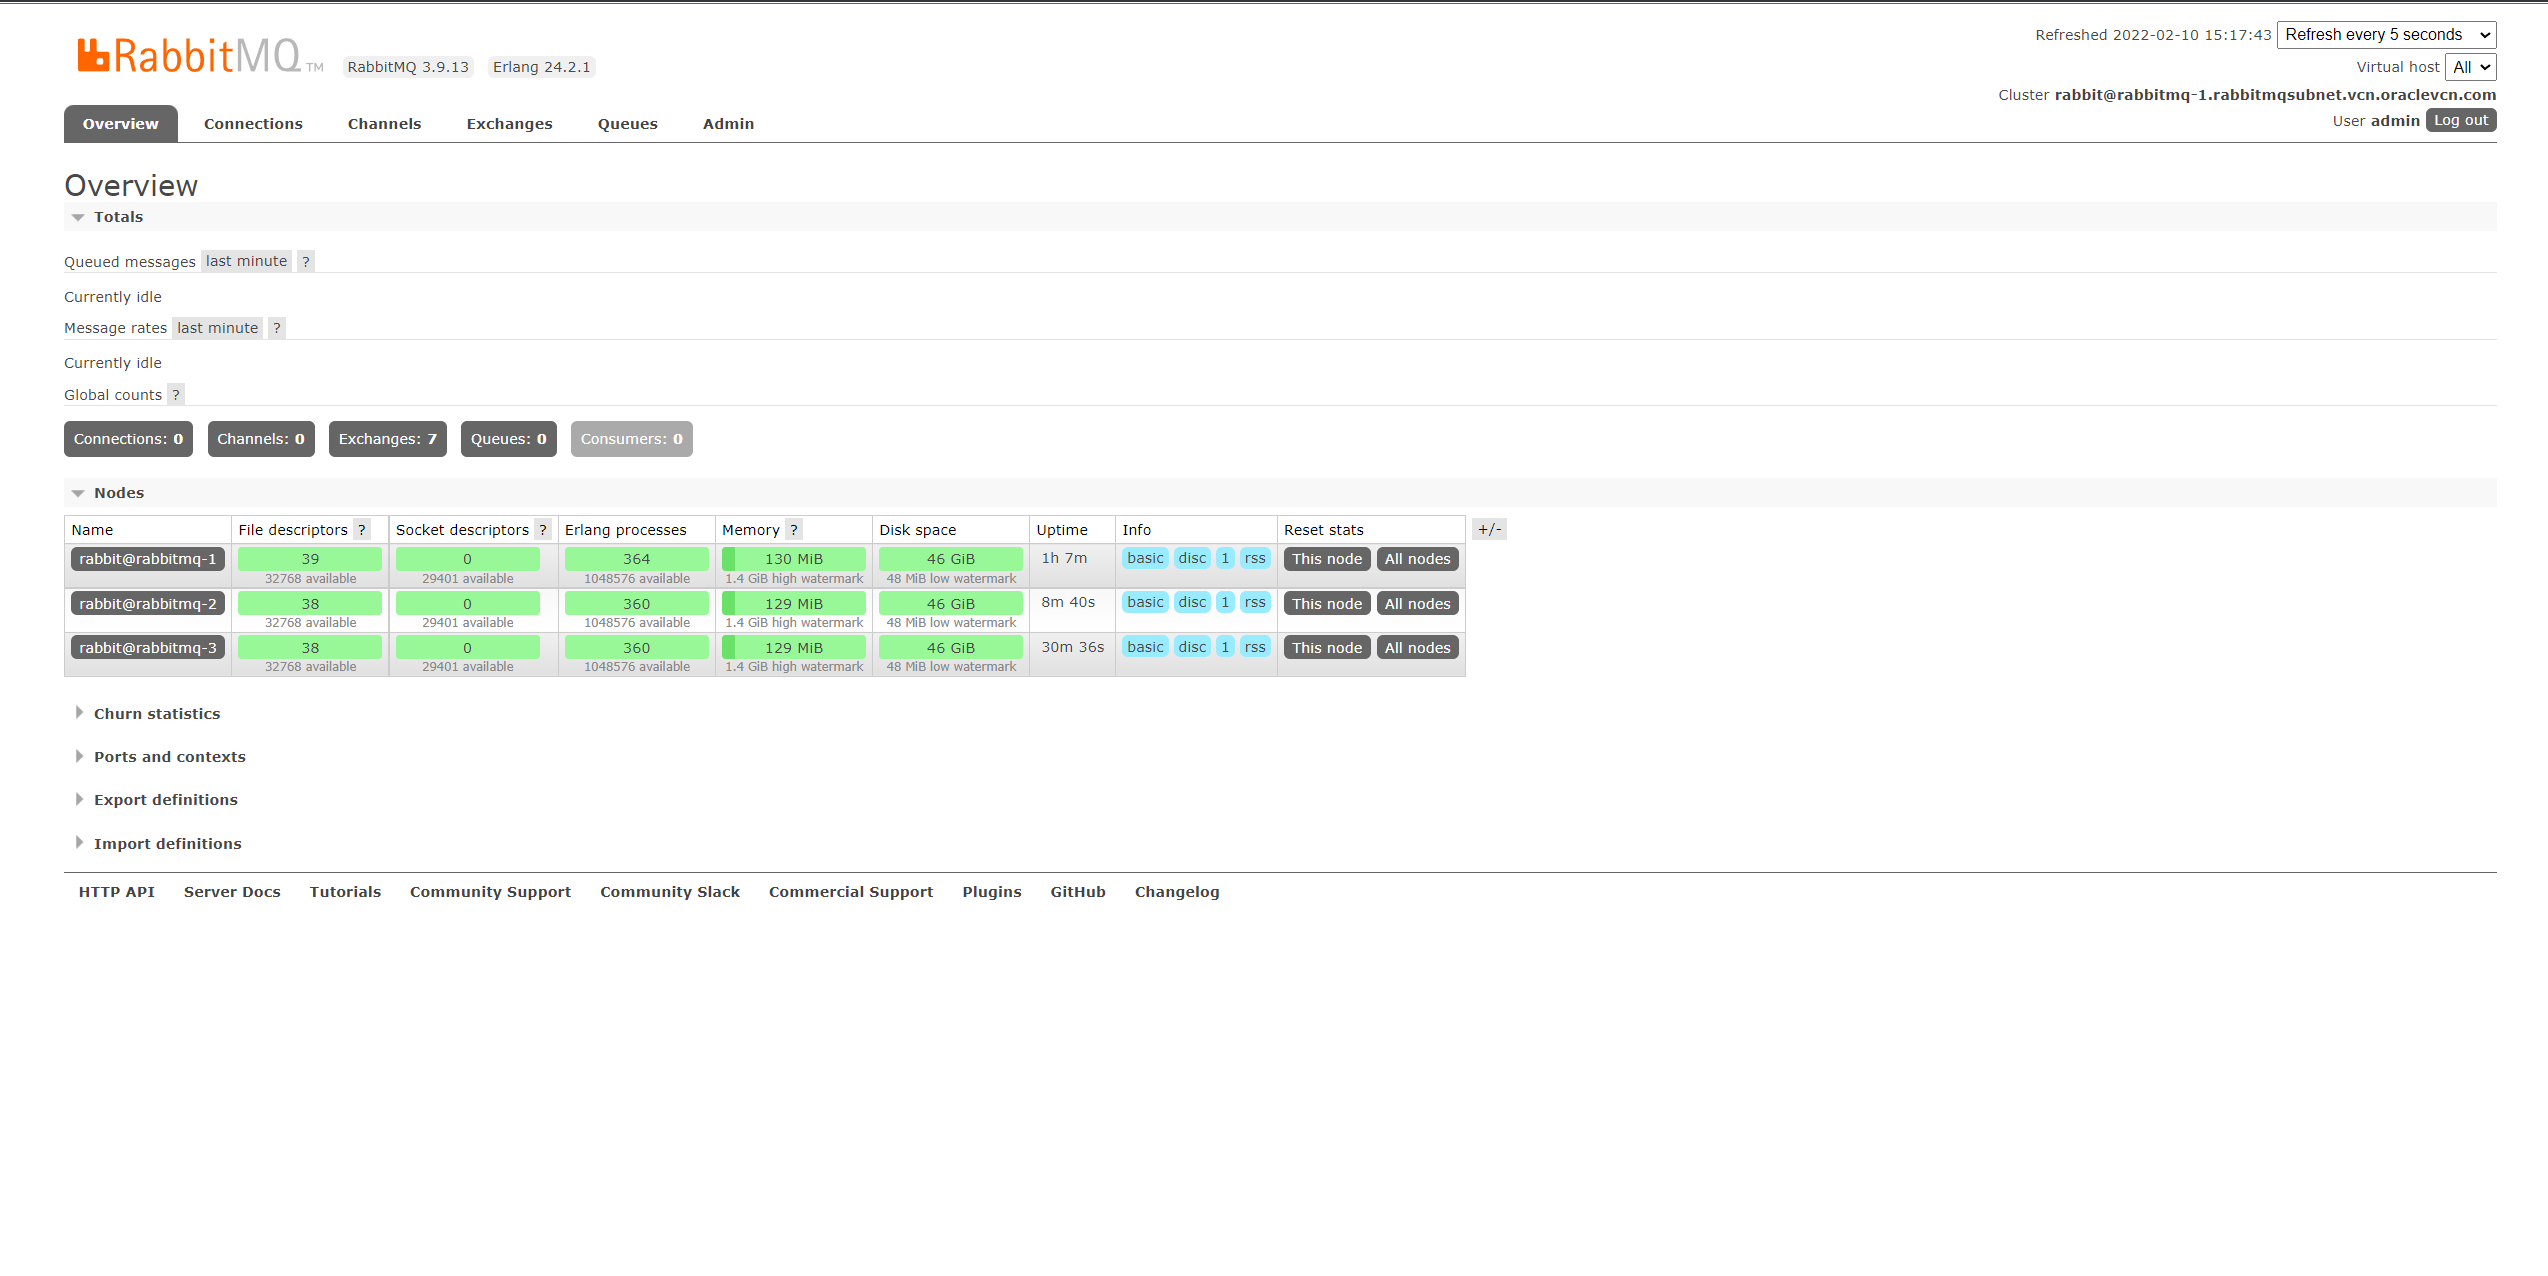
RabbitMQ Configuration Explanation
In rabbitmq.conf:
listeners.tcp = nonedisables all non TLS connections from clients.ssl_options.verifyenables peer verification for clients connections.ssl_options.fail_if_no_peer_certtells RabbitMQ to reject connections if peer certificate was not verified.default_useranddefault_passchange the default user fromguesttoadminand assign a new password.management.ssl.porttells the management UI to use TLS on port 9443.
In rabbitmq-env.conf:
RABBITMQ_MNESIA_DIRchanges the default data directory to use the block volume.
Conclusion
With this, we finished the installation and configuration of our cluster. It is worth mentioning that you may need to add or modify some configurations before making your cluster production-ready. Consult RabbitMQ documentation before doing so. You can also automate this entire process by writing Terraform and Ansible scripts to make your life easier.